Sharon from the community garden watched me wrestling a whole acorn squash one Tuesday afternoon. I was hunched over a cutting board, trying to get a clean slice out of the thing, and honestly, the knife was not cooperating. She didn’t say anything at first. Then she just walked over, gently took the knife from my hand, and said, “You’re fighting it. Let the squash tell you where it wants to cut.”
That moment stuck with me. It was less about the squash and more about the conversation that followed. Sharon is in her seventies, grew up on a farm in Iowa, and has a way of making everything feel simple. She told me her grandkids wouldn’t touch a vegetable with a ten-foot pole until she started cutting squash into rings instead of wedges. Rings, apparently, are fun. Rings look like something you’d eat at a carnival. And when you drizzle a little maple syrup on them and roast them until the edges get all caramelized and sticky? That’s when the magic happens.
I went home that afternoon with a new acorn squash, a lighter grip on my knife, and a promise to try her method. I’ll be honest—I burned the first batch. Got distracted by a phone call and walked back to a kitchen that smelled more like regret than maple. But the second batch? That was the one. The rings came out tender in the middle, crispy at the edges, and sweet enough that my own kids asked for seconds. Then thirds. I mean, when does that ever happen with squash?
Maybe you’ve been there—standing over a pile of roasted vegetables, wondering why your kids push them to the side of the plate. This recipe is for those nights. It’s the one that changes the conversation around the dinner table. Sharon’s trick became my trick, and now I’m passing it along to you. Let’s make some squash rings that actually disappear.
Why You’ll Love This Recipe
I’ve tested this recipe more times than I care to count. Some batches came out too soft, others not sweet enough, and a few were downright burnt. But after all that trial and error, I landed on a version that works every single time. Here’s why this one is different:
- Kid-Approved Shape – Rings are just more fun than chunks. Kids love picking them up, stacking them, or dipping them in sauce. It’s squash disguised as a treat.
- Simple Ingredients – You need an acorn squash, maple syrup, butter, and a few pantry staples. No fancy trips to a specialty store. You probably have everything already.
- Budget-Friendly – Acorn squash is one of the cheapest winter squashes out there. One squash feeds a family of four when served as a side. That’s hard to beat.
- Comes Together Fast – Active prep time is about 10 minutes. The oven does the rest. Perfect for those evenings when you’re juggling homework and laundry and just need something to work.
- Leftovers Reheat Beautifully – Pop them in the oven or air fryer the next day, and they crisp right back up. No sad, soggy squash situation.
- Picky Eater Tested – I served these to a group of six kids aged 4 to 11. Five of them asked for more. The sixth one dipped hers in ketchup, which honestly, I’ll take as a win.
This isn’t just another roasted squash recipe. The trick is slicing the squash into even rings, which ensures every piece cooks at the same rate. No more burnt edges and raw centers. Plus, the maple syrup caramelizes just enough to create a slight crunch on the outside while the inside stays soft and buttery. It’s comfort food that happens to be good for you, and let’s face it—that’s the kind of recipe we all need more of.
What Ingredients You Will Need
This recipe uses simple, wholesome ingredients that work together to create something genuinely delicious. Nothing complicated, nothing hard to find. Just real food that tastes good.
For the Squash Rings
- 1 medium acorn squash (about 1.5 to 2 pounds) – Look for one that feels heavy for its size and has a deep green color with some orange patches. That orange means it’s ripe and sweet.
- 2 tablespoons unsalted butter, melted – I use Kerrygold for the flavor, but any good butter works. You can substitute coconut oil or a vegan butter if needed.
- 2 tablespoons pure maple syrup – Please use the real stuff, not pancake syrup. Grade A dark amber is my favorite for roasting. It has a deeper flavor that stands up to the squash.
- 1/2 teaspoon ground cinnamon – Adds warmth and makes the kitchen smell incredible. Freshly ground is nice but pre-ground works perfectly.
- 1/4 teaspoon salt – Don’t skip this. Salt balances the sweetness and makes the flavors pop. I use fine sea salt.
- 1/8 teaspoon black pepper – Just a tiny pinch. You won’t taste it as pepper, but it adds depth. Trust me on this one.
- Optional: 1/8 teaspoon cayenne pepper – Only if your family likes a little heat. My kids don’t, so I leave it out, but my husband loves the kick.
For Serving (Optional but Recommended)
- Greek yogurt or sour cream – A dollop on the side adds a nice tangy contrast to the sweet squash.
- Chopped pecans or walnuts – Sprinkle on top for crunch. Toast them first for extra flavor.
- Fresh thyme or parsley – A little green makes the dish look prettier, and honestly, it adds a fresh note that cuts through the richness.
I buy my acorn squash from the local farmers’ market when they’re in season, usually from September through November. They store well, so I grab a few at a time. If you’re shopping at a grocery store, look for squash with intact stems and no soft spots. One medium squash yields about 8 to 10 rings, which is perfect for a family of four as a side dish.
For the maple syrup, I recommend getting a bottle from a local producer if you can. The flavor varies by region, and there’s something special about knowing where your syrup comes from. That said, any pure maple syrup from the store works just fine.
Equipment Needed
You don’t need much for this recipe, which is part of why I love it. Here’s what you’ll want to have on hand:
- Sharp chef’s knife – This is non-negotiable. A dull knife makes cutting acorn squash dangerous and frustrating. I use a 8-inch chef’s knife and sharpen it before starting.
- Cutting board – A sturdy wooden or plastic board. Put a damp paper towel underneath to keep it from sliding.
- Large baking sheet – A half-sheet pan works best. Line it with parchment paper for easy cleanup.
- Mixing bowl – For tossing the rings with butter and maple syrup. Any medium bowl works.
- Pastry brush – Optional but helpful for coating the rings evenly. You can also just use your hands or a spoon.
- Measuring spoons – For the maple syrup, butter, and spices.
- Metal spatula – For flipping the rings halfway through roasting. A thin, flexible one works best.
If you don’t have a pastry brush, don’t worry. I’ve used my fingers more times than I’d like to admit. Just wash your hands well first. And if you’re short on baking sheets, you can roast the rings in two batches. Crowding the pan leads to steaming instead of caramelizing, and we want those edges to get nice and crispy.
I’ve been using the same half-sheet pan for about eight years now. It’s stained and a little warped, but it still does the job. You don’t need fancy equipment to make good food. Just a sharp knife and a little patience.
Preparation Method
Let me walk you through this step by step. I’ve included all the little details I wish someone had told me the first time I made these.
- Preheat your oven to 400°F (200°C). Give it a full 15 minutes to come to temperature. A hot oven is key for getting those caramelized edges.
- Prepare the acorn squash. Wash the outside of the squash under cool water and pat it dry. Place it on your cutting board and use a sharp chef’s knife to carefully cut off both ends—just about 1/4 inch from each tip. This creates flat surfaces that make the squash stable and easier to cut.
- Slice the squash into rings. Stand the squash upright on one of the flat ends. Starting from the top, slice crosswise into rings about 1/2 inch thick. Work slowly and let the knife do the work. You should get 8 to 10 rings from one medium squash. When you reach the seed cavity, you’ll see the seeds and stringy bits inside each ring.
- Remove the seeds and strings. Use a small spoon or your fingers to gently scoop out the seeds and any stringy pulp from the center of each ring. Don’t worry about being perfect—a few leftover strings won’t hurt. Save the seeds if you want to roast them later. They make a great snack.
- Melt the butter and mix the glaze. In a small bowl, melt the 2 tablespoons of butter in the microwave for about 20 seconds. Stir in the 2 tablespoons of maple syrup, 1/2 teaspoon cinnamon, 1/4 teaspoon salt, and a pinch of black pepper. Whisk until everything is combined and smooth.
- Coat the squash rings. Place the rings in a large mixing bowl. Pour the butter-maple mixture over them. Use your hands or a silicone spatula to gently toss and coat each ring evenly. Make sure both sides get some of that glaze. It’s okay if a little pools at the bottom of the bowl—you’ll pour that over the rings on the baking sheet.
- Arrange on the baking sheet. Line a large baking sheet with parchment paper. Place the rings in a single layer, making sure they don’t overlap. Leave a little space between each ring so the hot air can circulate. Pour any remaining glaze from the bowl over the rings.
- Roast for 20 minutes. Place the baking sheet on the middle rack of your preheated oven. Set a timer for 20 minutes. At this point, the rings should be starting to soften and the edges will look slightly golden.
- Flip the rings. Remove the baking sheet from the oven. Use a metal spatula to carefully flip each ring over. They’ll be tender, so go gently. If any stick to the parchment, give them a little nudge. This step ensures even browning on both sides.
- Roast for another 15 to 20 minutes. Return the sheet to the oven and roast until the rings are tender when pierced with a fork and the edges are caramelized and slightly crispy. The total roasting time is usually 35 to 40 minutes, but ovens vary. Start checking at the 30-minute mark.
- Let them rest. Remove from the oven and let the rings sit on the baking sheet for 2 to 3 minutes. This allows them to firm up slightly, making them easier to transfer to a serving plate.
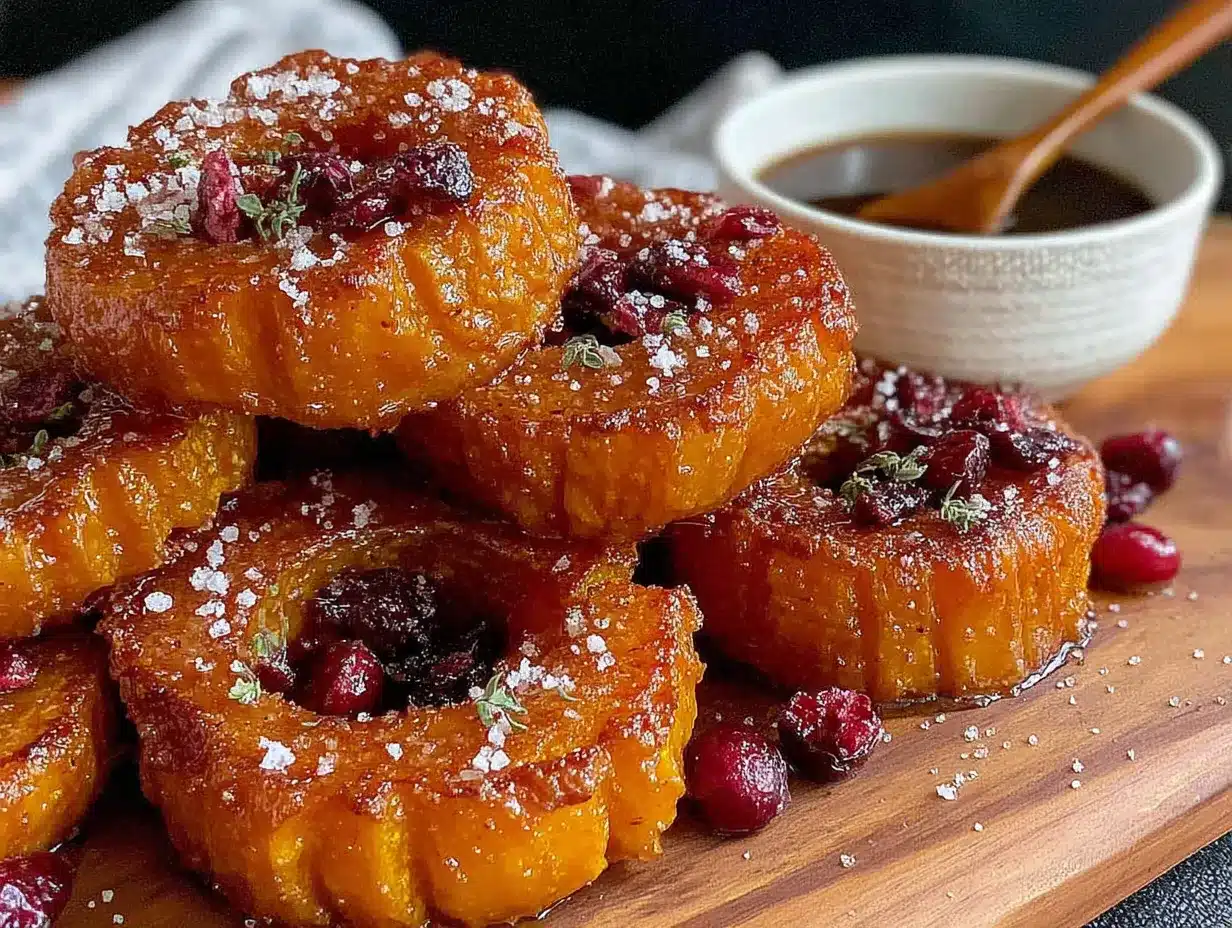
- Serve warm. Transfer the rings to a platter. If you’re adding toppings like Greek yogurt, chopped nuts, or fresh herbs, now’s the time. Serve immediately while they’re still warm and the edges are crispy.
One thing I learned the hard way: don’t walk away during the last 10 minutes of roasting. The line between perfectly caramelized and burnt is thin, especially if your oven runs hot. I keep a chair pulled up near the oven so I can peek through the window without opening the door and losing heat.
Cooking Tips & Techniques
I’ve made this recipe more times than I can count, and I’ve messed it up in just about every way possible. Here’s what I’ve learned so you don’t have to repeat my mistakes.
Use a sharp knife. I cannot stress this enough. A dull knife is dangerous with a hard squash like acorn. I sharpen mine right before starting. If you don’t have a sharpener, run the blade across the bottom of a ceramic mug a few times. It’s not perfect, but it helps.
Cut even rings. Aim for rings that are all about 1/2 inch thick. Thicker rings won’t cook through in time, and thinner ones will burn before the center is tender. I use my pinky finger as a rough guide—about the width of my pinky nail. Not scientific, but it works.
Don’t skip the salt. I made a batch without salt once, thinking the maple syrup would be enough. It wasn’t. The squash tasted flat and one-dimensional. Salt doesn’t just add saltiness—it enhances the natural sweetness of the squash and the maple. That little pinch makes everything sing.
Line your baking sheet. Parchment paper is your friend here. The maple syrup caramelizes and can stick to the pan, making cleanup a nightmare. Parchment prevents that and makes flipping the rings much easier. I’ve tried foil, and it works okay, but things stick more. Parchment is worth the investment.
Give them space. If the rings are crowded on the baking sheet, they’ll steam instead of roast. You want hot air circulating around each ring to get those crispy edges. If your baking sheet is small, roast in two batches. It takes a little longer, but the texture is so much better.
Check early. Every oven runs a little differently. Mine runs hot, so I start checking at the 30-minute mark. I pierce a ring with a fork—it should slide in easily with no resistance. The edges should be dark golden brown, almost sticky-looking. If the centers are still firm, give them another 5 minutes and check again.
Let them rest. I know it’s tempting to dig in right away, but letting the rings rest for a couple of minutes helps them firm up. They come out of the oven very tender, and moving them immediately can cause them to fall apart. A short rest makes them easier to handle and serve.
Variations & Adaptations
One of the best things about this recipe is how easy it is to change up. Here are some variations I’ve tried and loved.
Savory Version
Skip the maple syrup and cinnamon. Instead, toss the rings with melted butter, minced garlic, fresh rosemary, salt, and pepper. Roast the same way. The garlic gets fragrant and the rosemary adds an earthy note that pairs beautifully with the squash’s natural sweetness. I serve this version alongside roast chicken or pork chops.
Spicy Maple Version
Add 1/4 teaspoon of cayenne pepper and 1/8 teaspoon of smoked paprika to the maple-butter mixture. The heat builds slowly and contrasts with the sweet maple. My husband loves this version. The kids, not so much. But it’s a great option for adults-only dinners or when you want a little kick.
Herb and Honey Version
Replace the maple syrup with honey and add 1 teaspoon of fresh thyme leaves (or 1/2 teaspoon dried). The honey caramelizes a bit faster than maple, so check the rings at the 25-minute mark. This version has a more floral, delicate sweetness. I like it with roasted pork tenderloin or on a holiday table.
Dairy-Free Adaptation
Use melted coconut oil or a high-quality vegan butter instead of regular butter. The coconut oil adds a subtle tropical note that works surprisingly well with the maple. If using vegan butter, look for one with a high fat content for the best caramelization. I’ve used Miyoko’s and it works great.
Air Fryer Method
If you have an air fryer, this recipe adapts beautifully. Preheat the air fryer to 375°F (190°C). Arrange the glazed rings in a single layer in the basket—you may need to work in batches. Cook for 10 minutes, flip, then cook for another 5 to 8 minutes until tender and caramelized. The air fryer gives the edges an extra-crispy texture that’s hard to beat. Just watch them closely because air fryers cook faster than ovens.
Serving & Storage Suggestions
These squash rings are versatile enough to fit into almost any meal. Here’s how I like to serve and store them.
Serving temperature: Serve the rings warm, straight from the oven. They’re at their best when the edges are still crispy and the centers are soft. If they cool down too much, the caramelized coating can become chewy instead of crispy.
Presentation: Arrange the rings in a single layer on a large platter, slightly overlapping if needed. Sprinkle with a little flaky sea salt right before serving for a nice crunch and visual appeal. A few fresh thyme leaves or a dusting of cinnamon on top makes them look extra special.
What to serve with them: These rings pair beautifully with roasted chicken, pork chops, or grilled sausages. They also work well alongside a simple green salad with a tangy vinaigrette to cut through the sweetness. For a vegetarian meal, serve them with quinoa and roasted chickpeas. And honestly, they’re great on their own as a snack—my kids eat them straight off the baking sheet.
Storage: Store leftover rings in an airtight container in the refrigerator for up to 4 days. Place a paper towel in the container to absorb any excess moisture. The rings will soften over time, but they’re still delicious.
Reheating: The best way to reheat these is in the oven or air fryer. Preheat your oven to 350°F (175°C), spread the rings on a baking sheet, and warm for 5 to 7 minutes. In the air fryer, reheat at 350°F for 3 to 4 minutes. The microwave works in a pinch, but the rings will be soft rather than crispy. If you’re in a hurry, the microwave is fine—just know the texture won’t be the same.
Flavor development: The flavors actually meld and deepen after a day in the fridge. The maple and cinnamon seem to marry together more fully. I sometimes make a double batch on purpose so we can enjoy the leftovers the next day. They’re great cold, straight from the fridge, as a quick snack.
Nutritional Information & Benefits
These squash rings aren’t just delicious—they’re actually good for you. Here’s a rough breakdown per serving (about 4 rings, assuming 2 servings per squash):
- Calories: Approximately 180-200
- Total Fat: 8-10g
- Saturated Fat: 5-6g
- Carbohydrates: 28-32g
- Fiber: 4-5g
- Sugar: 12-15g (mostly natural from the squash and maple syrup)
- Protein: 2-3g
- Vitamin A: 20-25% of the Daily Value
- Vitamin C: 15-20% of the Daily Value
- Potassium: 10-12% of the Daily Value
Acorn squash is packed with vitamins and minerals. It’s an excellent source of vitamin A, which is important for eye health and immune function. It also provides a good amount of vitamin C, potassium, and fiber. The maple syrup adds some natural sweetness along with small amounts of minerals like zinc and manganese.
This recipe is naturally gluten-free and can be made dairy-free with a simple swap. It’s also vegetarian and can be adapted for vegan diets by using coconut oil instead of butter. The fiber content helps keep everyone full and satisfied, which is a nice bonus when you’re feeding a hungry family.
I’m not a nutritionist, but I’ve learned to pay attention to how food makes me feel. These squash rings give me steady energy without the crash you get from processed sweets. They satisfy that craving for something sweet and comforting while still being a real, whole food. That’s a win in my book.
Conclusion
This recipe came to me through a conversation in a community garden, and it’s become a staple in my kitchen ever since. It’s the kind of dish that proves you don’t need complicated techniques or hard-to-find ingredients to make something genuinely special. Just a good squash, a little maple syrup, and a willingness to try something new.
I love that this recipe brings people together. I’ve served it at weeknight dinners, holiday gatherings, and casual lunches with friends. Every time, someone asks for the recipe. Every time, someone says they didn’t know they liked acorn squash until they tried it this way. That never gets old.
So go ahead and give it a try. Cut your squash into rings instead of wedges. Let the maple syrup caramelize in the oven until the edges get all sticky and golden. Watch your kids reach for seconds. And if you burn the first batch like I did, don’t worry. The second one will be perfect.
I’d love to hear how these turn out for you. Leave a comment below and let me know if your family loved them as much as mine does. Did you try a variation? Did your kids dip them in something unexpected? Share your stories—I read every single one. And if you’re looking for more easy, family-friendly side dishes, check out my garlic parmesan roasted broccoli or these honey glazed carrots that disappear just as fast.
Happy cooking, friends. Your table is about to get a whole lot tastier.
Frequently Asked Questions
Can I use butternut squash instead of acorn squash?
Yes, you can. Butternut squash is a bit denser and sweeter than acorn, so the texture will be slightly different. Cut it into rings or half-moons about 1/2 inch thick. You may need to add 5 to 10 minutes to the roasting time since butternut is firmer.
Do I have to peel the squash?
No, you don’t. Acorn squash skin is edible and becomes tender when roasted. In fact, leaving the skin on helps the rings hold their shape better. Some people prefer to peel it, but I find the skin adds a nice texture and saves you a lot of work.
Can I make these ahead of time?
You can prepare the squash rings up to the point of roasting. Slice them, remove the seeds, and store the rings in an airtight container in the refrigerator for up to 24 hours. When you’re ready to serve, toss them with the glaze and roast as directed. You may need to add a few extra minutes to the cooking time if the rings are cold.
Why are my squash rings mushy?
Mushy rings usually mean they were overcrowded on the baking sheet or roasted at too low a temperature. Make sure your oven is fully preheated to 400°F and that the rings have space between them. If they’re touching, they’ll steam instead of roast. Also, check that your rings are cut evenly so they all cook at the same rate.
Can I freeze roasted acorn squash rings?
Yes, you can freeze them. Let the rings cool completely, then arrange them in a single layer on a baking sheet and freeze until solid. Transfer to a freezer-safe bag or container. They’ll keep for up to 3 months. To reheat, bake from frozen at 350°F for 10 to 12 minutes, or until heated through. The texture won’t be as crispy as fresh, but they’re still delicious.
PrintKid-Friendly Maple Roasted Acorn Squash Rings
Tender acorn squash rings roasted with a maple-butter glaze until caramelized and crispy at the edges. A fun, kid-approved side dish that’s simple to make and perfect for weeknight dinners.
- Prep Time: 10 minutes
- Cook Time: 35 minutes
- Total Time: 45 minutes
- Yield: 4 servings 1x
- Category: Side Dish
- Cuisine: American
Ingredients
- 1 medium acorn squash (about 1.5 to 2 pounds)
- 2 tablespoons unsalted butter, melted
- 2 tablespoons pure maple syrup
- 1/2 teaspoon ground cinnamon
- 1/4 teaspoon salt
- 1/8 teaspoon black pepper
- Optional: 1/8 teaspoon cayenne pepper
- For serving: Greek yogurt or sour cream (optional)
- For serving: chopped pecans or walnuts (optional)
- For serving: fresh thyme or parsley (optional)
Instructions
- Preheat your oven to 400°F (200°C).
- Wash the acorn squash, pat dry, and cut off both ends (about 1/4 inch from each tip) to create flat surfaces.
- Stand the squash upright and slice crosswise into rings about 1/2 inch thick (8 to 10 rings).
- Use a small spoon or your fingers to remove seeds and stringy pulp from the center of each ring.
- In a small bowl, melt the butter. Stir in maple syrup, cinnamon, salt, and black pepper until combined.
- Place the rings in a large mixing bowl. Pour the butter-maple mixture over them and toss gently to coat evenly.
- Line a large baking sheet with parchment paper. Arrange the rings in a single layer without overlapping. Pour any remaining glaze over the rings.
- Roast for 20 minutes on the middle rack.
- Remove the baking sheet, carefully flip each ring with a metal spatula.
- Roast for another 15 to 20 minutes, until tender when pierced with a fork and edges are caramelized and slightly crispy.
- Let the rings rest on the baking sheet for 2 to 3 minutes.
- Transfer to a platter and serve warm. Add optional toppings if desired.
Notes
Use a sharp knife for safe cutting. Cut rings evenly (about 1/2 inch thick). Don’t skip the salt—it enhances sweetness. Line the baking sheet with parchment for easy cleanup. Give rings space on the sheet to avoid steaming. Check early to prevent burning. Let rings rest for a few minutes before serving. For air fryer: cook at 375°F for 10 minutes, flip, then 5-8 more minutes.
Nutrition
- Serving Size: 4 rings
- Calories: 190
- Sugar: 13.5
- Sodium: 150
- Fat: 9
- Saturated Fat: 5.5
- Carbohydrates: 30
- Fiber: 4.5
- Protein: 2.5
Keywords: acorn squash rings, maple roasted squash, kid-friendly squash, easy side dish, fall recipe, roasted acorn squash