The school bake sale was in twelve hours and I’d completely forgotten. My son ran through the door with the flyer crumpled in his sticky fist, and my heart just sank. Every other mom would be bringing those elaborate themed cakes or perfectly decorated cookies they’d been planning for weeks. I had a half-empty bag of Oreos, some instant pudding mix I’d bought on a whim, and a pack of gummy worms left over from a birthday party goodie bag. Let me tell you, I stood there staring into the pantry feeling like I’d already lost. I mean, you know that feeling when you need to produce something amazing but the cupboard is basically bare? I almost just sent him with a store-bought package of cookies and called it a day.
But then I remembered this silly thing my grandma used to make with us kids on rainy afternoons. She’d crush up chocolate cookies, mix up some quick pudding, and layer it in little cups. She called them “mud pies” and we thought we were the luckiest kids alive. I figured, why not? I had the Oreos. I had the pudding. I grabbed a few clear plastic cups from the back of the cabinet and just went for it, honestly not expecting much. The whole thing took me maybe fifteen minutes, and I threw a few gummy worms on top because, well, it looked kind of like dirt. My son’s eyes went wide and he started laughing. That was a good sign.
The next morning at the bake sale, I was honestly a little embarrassed to put them out next to the fancy stuff. But you know what happened? Those little dirt cups sold out in the first twenty minutes. Kids were dragging their parents over, pointing and grinning. One little girl said they looked like “real gardens for worms.” I overheard a mom ask another mom for the recipe. I just stood there by the punch bowl, trying not to look too surprised. Honestly, the simple thing won. It always does, doesn’t it? That’s why I keep making these Easy Oreo Dirt Cups with Gummy Worms. They remind me that you don’t need a fancy plan or a kitchen full of gadgets to make something people genuinely love. You just need a little creativity and the willingness to look a little silly. And honestly, isn’t that what dessert should be about?
Why You’ll Love This Recipe
Let’s be real for a second. Feeding a family on a budget while trying to keep everyone happy is no small feat. These dirt cups are my secret weapon for birthday parties, school events, or just a random Tuesday when the kids need a win. Here’s why they work so well for real families like ours:
- Quick & Easy: Comes together in under 15 minutes with zero baking required. Perfect for those moments when you need a dessert fast and the oven is already full of something else.
- Simple Ingredients: You probably already have most of these in your kitchen. No fancy extracts, no hard-to-find specialty items. Just pudding, milk, Oreos, and gummy worms.
- Perfect for Kids: Let’s face it, kids eat with their eyes first. The “dirt” and “worms” gimmick works every single time. My own kids still giggle when they see me pulling out the gummy worms.
- Crowd-Pleaser: I’ve brought these to potlucks, classroom parties, and family reunions. Adults love the nostalgic factor, and kids devour them. They disappear faster than almost anything else on the table.
- Budget-Friendly: A whole batch costs less than a fancy coffee drink. You can feed a crowd without breaking the bank, which is huge when you’re feeding a family on a sensible budget.
What makes these different from every other dirt cup recipe out there? It’s the texture. I tested this dozens of times to get the perfect ratio of creamy pudding to crunchy Oreo crumble. Too much pudding and it’s soupy. Too many cookies and it’s dry. This version hits that sweet spot where every spoonful has a little bit of everything. Plus, I figured out that letting the pudding set for just the right amount of time makes the whole thing hold together better. No more pudding puddles at the bottom of the cup.
These Oreo Dirt Cups with Gummy Worms are the kind of dessert that makes you feel like a hero for almost no effort. They’re silly, they’re fun, and they taste genuinely good. My kids still ask for them on random weekends, and I never mind saying yes because I know I can whip them up in the time it takes to unload the dishwasher.
What Ingredients You Will Need
This recipe uses simple, affordable ingredients that you can find at any grocery store. The beauty of these dirt cups is that they rely on pantry staples and a few fun extras that won’t bust your budget.
For the Pudding Base:
- 1 (3.9 oz) box instant chocolate pudding mix – I prefer Jell-O brand for its consistent texture, but any store brand works just fine. Make sure it’s the instant kind, not cook-and-serve, or the texture will be off.
- 2 cups cold whole milk – Whole milk gives the richest, creamiest pudding. But I’ve used 2% and even oat milk in a pinch, and they work okay. Just know that lower-fat milk makes a slightly thinner pudding.
For the “Dirt” Layer:
- 1 (14.3 oz) package Oreo cookies – You’ll use the whole package, cream filling and all. Don’t bother scraping out the filling – it adds a little sweetness and helps the crumb stick together. I’ve tried this with generic chocolate sandwich cookies, and honestly, Oreos are worth the slight extra cost here.
For the Fun Stuff:
- 1 cup gummy worms – Get the sour ones if you want a little tangy contrast to the sweet pudding. Regular sweet ones work great too. I like the brand Trolli for their bright colors and chewy texture.
- Optional: 8 clear plastic cups (7-9 oz each) – Clear cups are key for showing off the layers. You can use small mason jars or even repurposed yogurt cups if you’re in a pinch.
- Optional: 8 gummy frogs or other gummy bugs – These are totally extra but kids lose their minds over them. I found a bag at the dollar store once and my kids still talk about it.
For the Whipped Topping (Optional but Recommended):
- 1 (8 oz) tub frozen whipped topping, thawed – Cool Whip is the classic choice. You can also use homemade whipped cream if you’re feeling fancy, but the tub version holds up better if you’re making these ahead of time.
A quick note on substitutions: If you need a dairy-free version, use almond milk or coconut milk and a dairy-free pudding mix. The texture will be slightly less creamy, but it still works. For a gluten-free option, use gluten-free chocolate sandwich cookies. I’ve tested this with the Glutino brand and it turned out great. Just know that gluten-free cookies tend to be a little more crumbly, so handle them gently.
Equipment Needed
You don’t need a fancy kitchen to make these dirt cups. Here’s what you’ll actually use:
- Mixing bowls – One medium bowl for the pudding, one large bowl for crushing the cookies. I use a glass bowl for the pudding because it’s easy to see when everything is mixed.
- Whisk – For mixing the pudding. A fork works in a pinch, but a whisk gives you a smoother result with fewer lumps.
- Rolling pin or food processor – To crush the Oreos into fine crumbs. A rolling pin and a zip-top bag is the budget-friendly method. A food processor makes it faster but isn’t necessary.
- Measuring cups and spoons – For the milk and any optional additions.
- Small spatula or spoon – For layering the pudding and crumbs into the cups.
- 8 clear plastic cups (7-9 oz) – Clear cups let you see the beautiful layers. I buy a pack at the dollar store for a couple bucks.
If you don’t have a rolling pin, a sturdy glass or a wine bottle works just as well. I’ve crushed cookies with a can of beans before when I was in a rush. It’s not pretty, but it works. For the food processor route, pulse the cookies in short bursts so you don’t end up with cookie dust. You want a mix of fine crumbs and slightly bigger pieces for texture.
Preparation Method
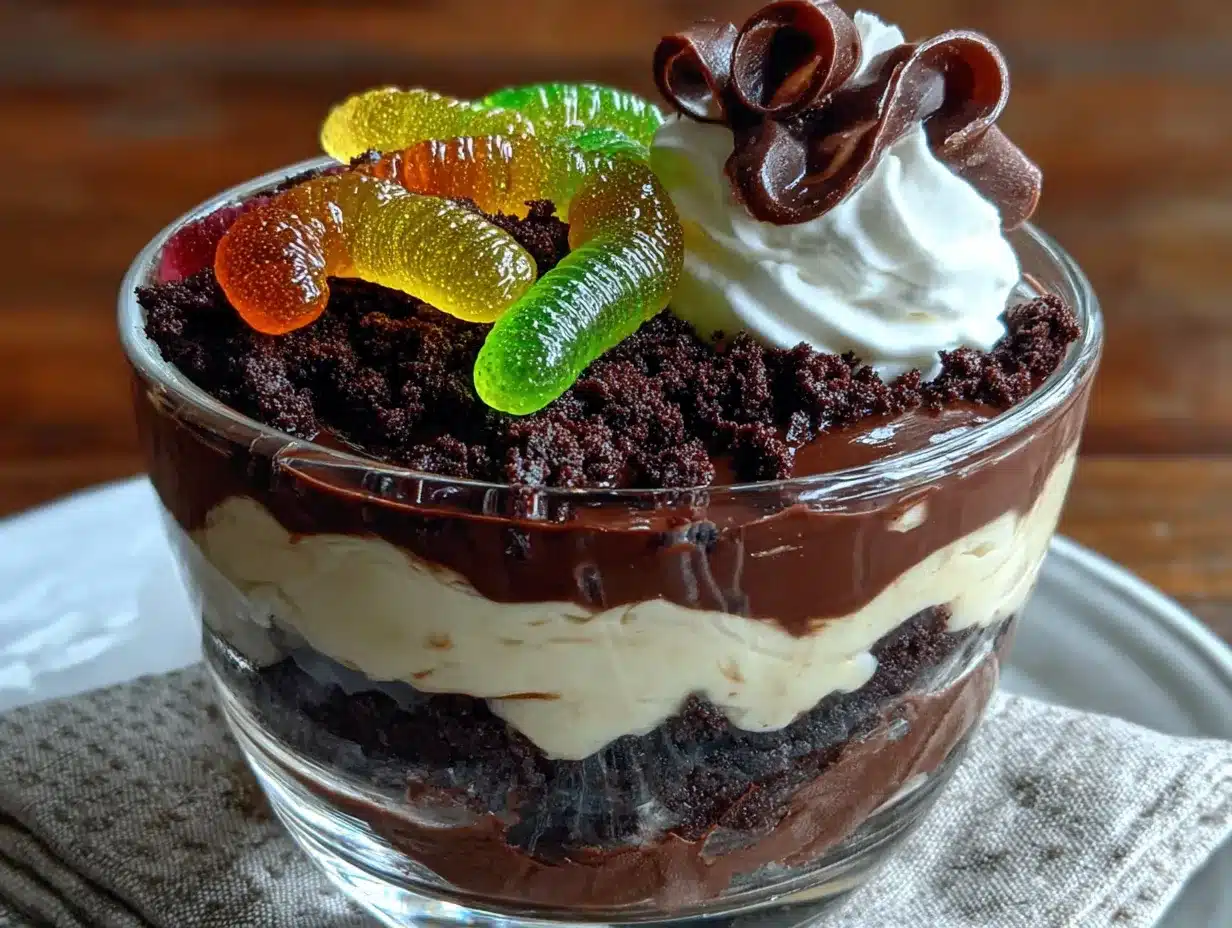
Let’s get to the fun part. This whole process takes about 15 minutes of active time, plus about 10 minutes for the pudding to set. Here’s exactly how I do it:
Step 1: Make the Pudding
In a medium mixing bowl, whisk together the instant chocolate pudding mix and 2 cups of cold whole milk. Whisk vigorously for about 2 minutes until the mixture thickens. You’ll notice it start to get glossy and hold its shape. Don’t overmix or it can get grainy. Set the bowl aside and let it sit for about 5 minutes to fully set. The pudding should be thick enough that it doesn’t immediately run off a spoon.
Step 2: Crush the Oreos
While the pudding is setting, open the package of Oreos. Place them in a large zip-top bag and seal it, squeezing out as much air as possible. Using a rolling pin (or a sturdy glass), crush the cookies into fine crumbs. You want a mix of fine powder and small pea-sized pieces. Don’t go too fine or you’ll lose that “dirt” texture. If you’re using a food processor, pulse 6-8 times until you get the right consistency. Set the crumbs aside in a shallow bowl.
Step 3: Layer the Cups
Now comes the fun part. Take your clear cups and start layering. Spoon about 2 tablespoons of Oreo crumbs into the bottom of each cup. Press down gently with the back of the spoon to create a solid base layer. Next, spoon about 3 tablespoons of the chocolate pudding on top of the crumbs. Spread it evenly with the back of the spoon. Add another layer of Oreo crumbs, about 1-2 tablespoons, on top of the pudding. Repeat with another layer of pudding if you want taller cups. I usually do two layers of each for a nice visual effect.
Step 4: Add the Worms
Here’s where the magic happens. Take your gummy worms and gently press them into the top layer of pudding or crumbs. Let a few “escape” over the edge of the cup for that creepy-crawly effect. I usually use 3-4 worms per cup, but feel free to go wild. The kids will love seeing the worms poking out from the “dirt.”
Step 5: Optional Whipped Topping
If you’re using whipped topping, spoon a dollop on top of each cup before adding the final crumb layer. This gives a nice creamy contrast to the crunchy crumbs. I like to add a thin layer of crumbs on top of the whipped cream so it looks like a little mound of dirt with worms crawling out.
Step 6: Chill and Serve
Pop the cups into the refrigerator for at least 10 minutes before serving. This lets the layers settle and the flavors meld together. If you’re making them ahead of time, they’ll keep in the fridge for up to 2 days. Just add the gummy worms right before serving so they stay chewy and bright.
A few things I’ve learned the hard way: Don’t skip the chilling step. The texture is way better after the pudding has had time to fully set. Also, if you’re layering, don’t press the crumbs down too hard or they’ll mix into the pudding and you’ll lose that distinct layer look. Gentle pressure is all you need.
Cooking Tips & Techniques
After making these dirt cups about a hundred times (no exaggeration – my kids request them constantly), I’ve picked up a few tricks that make a real difference.
Get the Pudding Right
The biggest mistake people make is not letting the pudding set long enough. Instant pudding needs a full 5 minutes to thicken properly. If you’re in a rush, use cold milk straight from the fridge and whisk it vigorously. I once tried to speed things up with room temperature milk and ended up with soup. Never again. Also, if you want an extra thick pudding, use 1 3/4 cups of milk instead of 2 cups. It makes a denser, more decadent texture that holds up better in the layers.
Crush Strategically
Don’t crush all the Oreos into dust. You want a mix of textures – some fine powder that looks like real dirt, and some slightly bigger chunks that add crunch. I usually crush about two-thirds of the cookies into fine crumbs and leave the rest a bit chunky. This gives each bite a satisfying texture variation.
Keep the Worms Happy
Gummy worms can get sticky and hard if they sit in the fridge too long. I always add them right before serving. If you’re making these for a party, prep the cups with the pudding and crumbs, then stash them in the fridge. Right before you serve them, press the worms into the top layer. They’ll stay soft and chewy this way.
Layer Like a Pro
Use a spoon to gently spread each layer without disturbing the one below it. I tilt the cup slightly and spoon the pudding along the side to avoid disturbing the crumb layer. It takes a little practice, but the visual result is worth it. Those clean layers are what make these cups so Instagram-worthy.
Variations & Adaptations
One of the best things about these dirt cups is how easy they are to customize. Here are some variations I’ve tried and loved:
Peanut Butter Dirt Cups
Add a layer of peanut butter between the pudding and the crumbs. Just melt 1/4 cup of peanut butter in the microwave for 15 seconds and drizzle it over the pudding layer. The salty-sweet combo is incredible. My husband requests this version every time.
Mint Chocolate Dirt Cups
Use mint-flavored Oreos instead of regular ones. The mint and chocolate combination is refreshing and perfect for spring or summer parties. I’ve also added a drop of peppermint extract to the pudding for extra minty goodness.
Vegan-Friendly Version
Use dairy-free chocolate pudding mix with oat milk or almond milk. Grab a package of vegan chocolate sandwich cookies (Oreos are actually vegan, believe it or not) and use coconut whipped cream on top. The texture is slightly different but still delicious. My vegan friend Sarah loves this version.
Birthday Cake Dirt Cups
Swap the chocolate pudding for vanilla or white chocolate pudding. Use golden Oreos instead of regular ones. Top with rainbow sprinkles and colorful gummy worms. This version is a huge hit at birthday parties – it feels more festive and less “spooky.”
Low-Sugar Option
Use sugar-free pudding mix and sugar-free chocolate sandwich cookies. The taste is surprisingly close to the original. I’ve made this for a friend who’s watching her sugar intake, and she said it satisfied her chocolate craving without the guilt.
Serving & Storage Suggestions
These dirt cups are best served chilled, straight from the fridge. The contrast between the cold creamy pudding and the crunchy Oreo crumbs is what makes them so satisfying. I like to serve them on a tray with a little sign that says “Dirt Cups – Eat at Your Own Risk” for a fun touch.
What to Serve With Them
These are a standalone dessert, but they pair beautifully with a scoop of vanilla ice cream or a drizzle of chocolate syrup. For a themed party, serve them alongside other “garden” treats like fruit skewers (make them look like flowers) or green punch (call it “swamp juice”). Kids eat that stuff up.
Storage
Store any leftover cups in the refrigerator, covered with plastic wrap or a lid. They’ll keep for up to 2 days, but the cookies will soften over time. I actually prefer them the next day when the crumbs have softened slightly into the pudding – it’s like a different dessert entirely. Don’t freeze them, though. The texture gets weird and the gummy worms turn into little rocks.
Make Ahead Tips
You can assemble the cups up to 24 hours in advance. Just leave the gummy worms off until you’re ready to serve. The pudding and crumbs will settle together beautifully, and the worms will stay fresh and chewy. This is my go-to strategy for school parties and potlucks.
Nutritional Information & Benefits
Let’s be honest – these are a treat, not a health food. But here’s the breakdown if you’re curious. Per serving (one cup made with whole milk and full-fat ingredients): approximately 380 calories, 16g fat, 54g carbohydrates, 5g protein, and 32g sugar. The portion size is reasonable for a dessert, and kids usually only need one cup to feel satisfied.
On the plus side, the milk in the pudding provides calcium and vitamin D. The Oreos offer a small amount of iron from the enriched flour. And the gummy worms? Well, they make kids smile, and that counts for something, right? If you’re looking to lighten things up, use low-fat milk and sugar-free pudding mix. You’ll save about 80 calories per serving.
A quick note on allergens: This recipe contains dairy (milk, cream), wheat (Oreos), and soy (often in chocolate pudding). If you’re serving a crowd with allergies, check labels carefully. The vegan variation I mentioned earlier works great for dairy-free and egg-free diets.
Conclusion
These Easy Oreo Dirt Cups with Gummy Worms are proof that you don’t need a fancy recipe or expensive ingredients to make something truly special. They’re fun, they’re fast, and they taste like childhood. Every time I make them, I remember that bake sale morning and how the simplest thing won the day. That’s the kind of dessert I want to keep making.
I hope you give these a try for your next family movie night, school party, or just because it’s Tuesday. Don’t be afraid to make them your own – add your favorite candy, switch up the pudding flavor, or let the kids help with the layering. That’s where the real magic happens. If you do make them, I’d love to hear how they turned out. Drop a comment below or tag me in your photos. Happy cooking, friends!
Frequently Asked Questions
Can I make these dirt cups ahead of time?
Yes, absolutely! You can assemble the cups up to 24 hours in advance. Just wait to add the gummy worms until right before serving so they stay chewy and fresh. The pudding and cookie layers will actually meld together beautifully overnight, creating a more cohesive texture.
Can I use homemade whipped cream instead of Cool Whip?
You can, but keep in mind that homemade whipped cream is less stable and may deflate over time. If you’re serving these within a few hours, go for it. For make-ahead cups, stick with the tub version – it holds up much better in the fridge.
How do I get the layers to look so clean?
The secret is patience. Let the pudding set fully before layering. When you spoon each layer, do it gently and use the back of the spoon to spread it without disturbing the layer below. Tilting the cup slightly helps you see what you’re doing. And don’t press the crumbs down too hard – a gentle pat is all you need.
Can I use a different type of cookie?
Definitely! Golden Oreos, mint Oreos, or even gluten-free chocolate sandwich cookies all work great. You can also use chocolate wafer cookies or crushed chocolate graham crackers. Just keep in mind that different cookies have different textures, so you may need to adjust the amount of crumbs.
How many cups does this recipe make?
This recipe makes about 8 standard-sized cups (7-9 oz each). If you’re using smaller cups, you’ll get more servings. If you’re making them for a party, I usually double the recipe – they go fast, and it’s better to have extra than to run out.
PrintBest Easy Oreo Dirt Cups with Gummy Worms
These no-bake Oreo Dirt Cups with Gummy Worms are a quick, fun, and budget-friendly dessert that kids and adults love. With creamy chocolate pudding, crunchy Oreo crumbles, and chewy gummy worms, they’re perfect for parties, bake sales, or a simple family treat.
- Prep Time: 15 minutes
- Cook Time: 0 minutes
- Total Time: 25 minutes
- Yield: 8 servings 1x
- Category: Dessert
- Cuisine: American
Ingredients
- 1 (3.9 oz) box instant chocolate pudding mix
- 2 cups cold whole milk
- 1 (14.3 oz) package Oreo cookies
- 1 cup gummy worms
- Optional: 8 clear plastic cups (7-9 oz each)
- Optional: 8 gummy frogs or other gummy bugs
- Optional: 1 (8 oz) tub frozen whipped topping, thawed
Instructions
- In a medium mixing bowl, whisk together the instant chocolate pudding mix and 2 cups of cold whole milk. Whisk vigorously for about 2 minutes until the mixture thickens. Let it sit for about 5 minutes to fully set.
- While the pudding is setting, place the Oreos in a large zip-top bag and seal it, squeezing out as much air as possible. Using a rolling pin or a sturdy glass, crush the cookies into fine crumbs with a mix of fine powder and small pea-sized pieces. Set aside.
- Take your clear cups and spoon about 2 tablespoons of Oreo crumbs into the bottom of each cup. Press down gently with the back of the spoon to create a solid base layer. Spoon about 3 tablespoons of chocolate pudding on top of the crumbs. Spread evenly. Add another layer of Oreo crumbs (1-2 tablespoons) on top of the pudding. Repeat with another layer of pudding if desired.
- Gently press gummy worms into the top layer of pudding or crumbs, letting a few ‘escape’ over the edge of the cup. Use 3-4 worms per cup.
- If using whipped topping, spoon a dollop on top of each cup before adding the final crumb layer. Add a thin layer of crumbs on top of the whipped cream.
- Refrigerate the cups for at least 10 minutes before serving. For best results, add gummy worms just before serving. Store leftovers in the refrigerator for up to 2 days.
Notes
For best results, let the pudding set fully before layering. Add gummy worms just before serving to keep them chewy. Use whole milk for richest texture; 2% or oat milk work but yield thinner pudding. For dairy-free, use almond or coconut milk with dairy-free pudding mix. For gluten-free, use gluten-free chocolate sandwich cookies.
Nutrition
- Serving Size: 1 cup
- Calories: 380
- Sugar: 32
- Sodium: 380
- Fat: 16
- Saturated Fat: 8
- Carbohydrates: 54
- Fiber: 2
- Protein: 5
Keywords: Oreo dirt cups, gummy worms, no-bake dessert, chocolate pudding, kid-friendly dessert, easy dessert, bake sale recipe