My neighbor, a retired caterer named Rosa, watched me struggling to pipe store-bought frosting onto a birthday cake one afternoon and didn’t say anything at first. Then she just handed me a chipped ceramic bowl filled with the most perfectly creamy deviled eggs I had ever seen. “Forget the cake,” she said with a wink. “Bring these to your next party, and nobody will remember the dessert.” I laughed, but honestly, she was right. That day, she didn’t just give me a recipe—she gave me a conversation starter. She told me about her grandmother in Veracruz who would make them for every family gathering, adding a pinch of smoked paprika that tasted like home. I adapted her method over the years, tweaking the filling until it was just the right balance of tangy and rich. But when Halloween rolled around last year, I had a crazy idea: what if I turned Rosa’s classic deviled eggs into something spooky? I mean, let’s face it—deviled eggs are already kind of perfect for a party. They’re bite-sized, they disappear fast, and they look impressive without much fuss. So I added a little food coloring, some black olive “spiders,” and a few paprika “blood spatters.” The result? A platter that stole the entire Halloween spread. My friend Dave, who claims he doesn’t like eggs, ate four before I could even say “trick or treat.” Maybe you’ve been there—staring at a table full of store-bought snacks, wishing you had something homemade that actually wowed people. These spooky deviled eggs are that dish. They’re the reason I keep making them year after year, and why Rosa’s chipped bowl still sits on my counter.
Why You’ll Love This Recipe
Listen, I’ve tested this recipe more times than I care to admit. I’ve over-boiled eggs until they turned gray, I’ve under-seasoned the filling until it tasted like sadness, and I’ve even dropped an entire platter of finished eggs on the floor (RIP, little guys). But through all that trial and error, I landed on a version that is practically foolproof. Here’s why you’ll absolutely love it:
- Quick & Easy: Comes together in under 30 minutes, with most of that time being hands-off while the eggs boil. Perfect for busy Halloween prep or last-minute party invites.
- Simple Ingredients: No fancy grocery trips needed. You likely already have eggs, mayo, mustard, and paprika in your kitchen. The spooky decorations use pantry staples like olives and food coloring.
- Perfect for Hosting: Great for Halloween parties, potlucks, festive get-togethers, or even a spooky movie night. They’re the kind of appetizer that makes guests think you spent hours in the kitchen.
- Crowd-Pleaser: Always gets rave reviews from kids and adults alike. I’ve watched grown men argue over the last spider-topped egg.
- Unbelievably Delicious: The texture is silky, the flavor is tangy and rich, and the spooky decorations make them impossible to resist.
What makes this recipe different from the rest? It’s the technique. Instead of just mashing yolks with mayo, I use a food processor to get an ultra-smooth, almost mousse-like filling. Then I add a splash of pickle brine—trust me on this one—for a tangy kick that cuts through the richness. Plus, the spooky decorations are designed to hold up for hours on a party table without wilting or smearing. This isn’t just another deviled egg recipe. It’s your new Halloween secret weapon.
This recipe is the kind that makes you close your eyes after the first bite. It’s comfort food reimagined—faster, spookier, but with the same soul-soothing satisfaction. Perfect for impressing guests without stress, or turning a simple Halloween gathering into something memorable.
What Ingredients You Will Need
This recipe uses simple, wholesome ingredients to deliver bold flavor and satisfying texture without the fuss. Most of these are pantry staples, so you probably won’t need to make a special trip to the store—unless you’re out of eggs, of course.
For the Deviled Eggs
- 12 large eggs, room temperature (older eggs peel easier, so buy them a few days ahead if possible)
- 1/3 cup mayonnaise (I recommend Duke’s or Hellmann’s for best texture—avoid Miracle Whip, it’s too sweet)
- 1 tablespoon yellow mustard (or Dijon for a sharper flavor)
- 1 tablespoon pickle brine (from dill pickles—adds tang and helps emulsify the filling)
- 1/2 teaspoon salt (adjust to taste)
- 1/4 teaspoon black pepper (freshly ground is best)
- 1/4 teaspoon smoked paprika (plus more for garnish)
For the Spooky Decorations
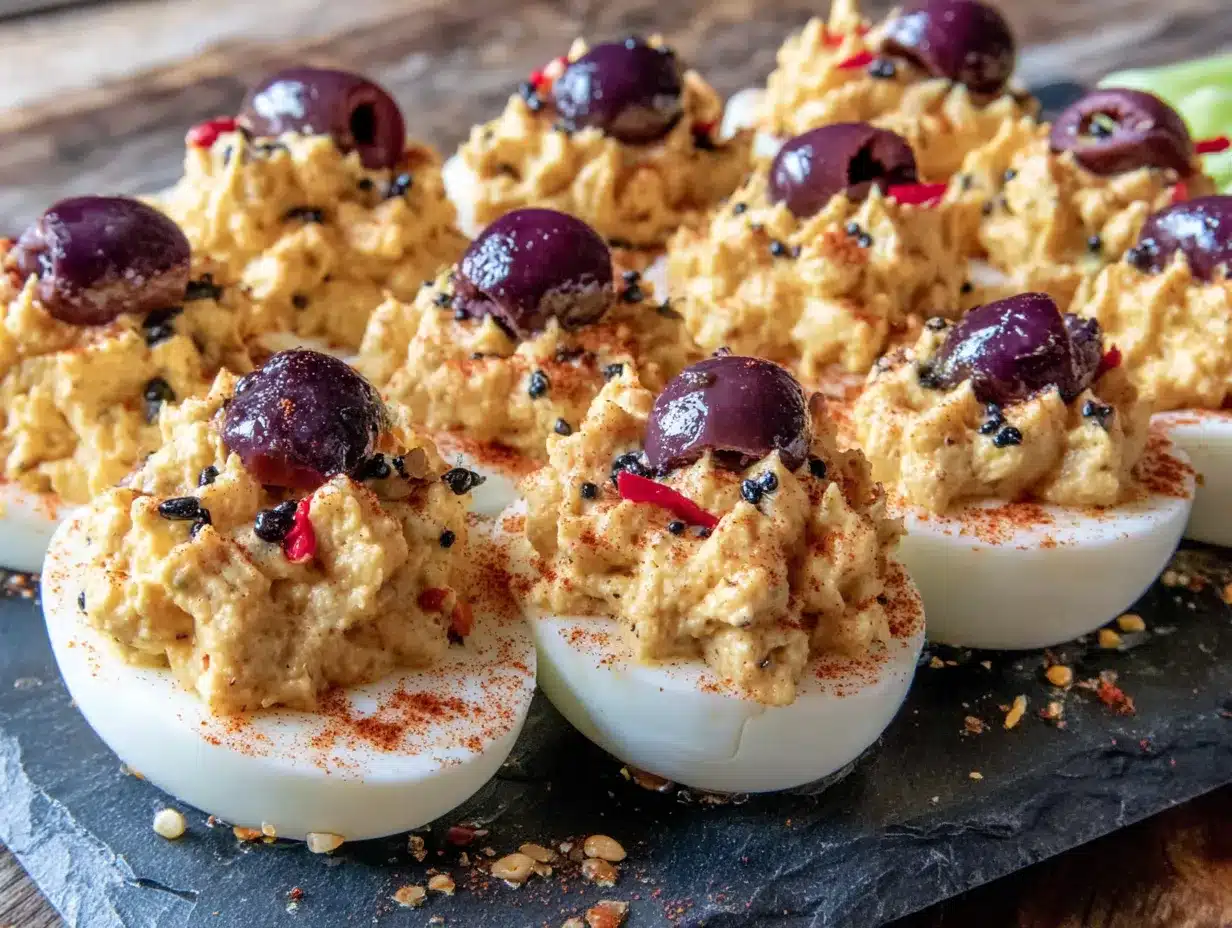
- 1 can (6 oz) black olives, drained and sliced into “spider” shapes (you’ll need about 24 slices total)
- Red food coloring (gel works best for vibrant color—I use Wilton brand)
- Green food coloring (optional, for “monster” eggs)
- Purple food coloring (optional, for “witch” eggs)
- Fresh chives or green onion tops, cut into small pieces (for “worms” or “eyeball veins”)
For the paprika “blood spatters,” I just use the same smoked paprika from the filling. You can also use regular paprika if that’s what you have. The smoky flavor adds a nice depth to the finished eggs, so I wouldn’t skip it entirely.
If you’re hosting a crowd, feel free to double the recipe. Just use a larger pot for boiling, and make sure you have enough fridge space to chill the finished eggs before serving. I once made 48 of these for a Halloween block party, and they disappeared within 20 minutes.
Equipment Needed
You don’t need any fancy gadgets for this recipe, but a few tools will make your life significantly easier:
- Large pot (big enough to hold 12 eggs in a single layer without crowding)
- Slotted spoon (for gently lowering eggs into boiling water and removing them)
- Bowl of ice water (for shocking the eggs after boiling—this is crucial for easy peeling)
- Food processor or blender (for ultra-smooth filling; you can also use a fork and elbow grease, but the texture won’t be as silky)
- Piping bag or zip-top bag (for filling the egg whites neatly; a zip-top bag with the corner snipped off works perfectly)
- Sharp knife (for cleanly halving the eggs and slicing olives)
- Small bowls (for mixing food coloring and water)
- Serving platter (a white or black platter makes the colors pop—I use a black slate board for Halloween)
If you don’t have a food processor, don’t worry. I’ve made these many times with just a fork and a bowl. The texture will be slightly chunkier, but the flavor is still spot-on. Just mash the yolks thoroughly, then whisk in the wet ingredients until smooth.
Pro tip: invest in a good vegetable peeler for removing hard-boiled egg shells. I know it sounds weird, but peeling eggs under running water with a peeler is a game-changer. I learned this from Rosa, and I’ve never looked back.
Preparation Method
Follow these steps carefully, and you’ll have perfect spooky deviled eggs every time. I’ve included all the little details I wish someone had told me when I first started making these.
Step 1: Boil the Eggs
Place your eggs in a large pot in a single layer. Cover them with cold water by about an inch. Bring the water to a rolling boil over high heat—this should take about 8-10 minutes. Once it’s boiling, cover the pot, turn off the heat, and let the eggs sit for exactly 12 minutes. This method gives you fully cooked yolks without that ugly green ring around the outside. While the eggs are resting, prepare a bowl of ice water large enough to hold all the eggs.
Step 2: Shock and Peel
Using a slotted spoon, transfer the eggs to the ice water bath. Let them sit for at least 5 minutes—this stops the cooking process and makes peeling infinitely easier. Once they’re cool enough to handle, gently tap each egg on the counter to crack the shell all over. Start peeling from the wider end (where the air pocket is) under running cold water. The water helps get between the shell and the egg white. Don’t worry if you lose a few chunks—you can hide those on the bottom of the platter.
Step 3: Halve the Eggs
Using a sharp knife, slice each peeled egg in half lengthwise. Gently pop out the yolks into a medium bowl. Arrange the egg white halves on your serving platter, cut side up. If they wobble, trim a tiny sliver off the bottom to make them stable. Trust me, you don’t want eggs rolling off the platter at your party.
Step 4: Make the Filling
Add the mayonnaise, yellow mustard, pickle brine, salt, black pepper, and smoked paprika to the bowl with the yolks. Mash everything together with a fork until combined, then transfer to a food processor. Pulse for about 30 seconds, scraping down the sides once, until the mixture is silky smooth. Taste and adjust seasoning—I usually add another pinch of salt and a dash more paprika. The filling should be creamy but firm enough to hold its shape when piped.
Step 5: Color the Filling (Optional but Fun)
If you want to make colored deviled eggs for Halloween, divide the filling into separate bowls. Add a few drops of food coloring to each bowl and stir until evenly distributed. I usually make one batch green (for “monster” eggs) and leave the rest natural. You can also make purple or orange for a full Halloween palette. Be careful not to overmix—gel food coloring can get intense quickly.
Step 6: Pipe the Filling
Spoon the filling into a piping bag fitted with a star tip, or into a zip-top bag with one corner snipped off. Pipe the filling into each egg white half, creating a swirl or a dollop. Don’t overfill—you want a nice mound, not a volcano. If you’re using multiple colors, clean the piping bag between batches or use separate bags.
Step 7: Add Spooky Decorations
Now for the fun part! For spider deviled eggs, place two black olive slices on each egg to form the body, then cut thin strips from the remaining olives to create legs (four on each side). For “blood spatter” eggs, dip a toothpick in red food coloring and lightly flick it over the eggs to create a spattered effect. For “eyeball” eggs, place a small piece of green onion on top of the filling and dot the center with red food coloring. Get creative—I once made “zombie” eggs by adding a stripe of green food coloring down the center.
Step 8: Garnish and Serve
Sprinkle a light dusting of smoked paprika over the eggs for color and flavor. If you’re feeling extra, add a tiny dollop of sour cream or a sprinkle of fresh chives. Refrigerate the eggs for at least 30 minutes before serving to let the flavors meld. They’re best served cold, straight from the fridge.
Cooking Tips & Techniques
I’ve made plenty of mistakes with deviled eggs over the years, so you don’t have to. Here are my hard-earned tips for perfect results every time:
Use older eggs for easier peeling. Fresh eggs are a nightmare to peel—the shells stick like glue. Buy your eggs at least a week before you plan to make these. If you’re in a pinch, add a teaspoon of baking soda to the boiling water. It raises the pH and helps loosen the shells.
Don’t overcook the eggs. That green ring around the yolk? That’s from overcooking. The 12-minute rest method gives you perfectly cooked yolks every time. If you’re at high altitude, add an extra minute or two to the rest time.
Make the filling ahead of time. You can prepare the filling up to 2 days in advance and store it in a piping bag in the fridge. When you’re ready to serve, just pipe and decorate. This is a lifesaver for Halloween parties when you’re juggling a dozen other dishes.
Don’t skip the pickle brine. I know it sounds weird, but that little splash of acidity brightens the entire filling and cuts through the richness of the yolks and mayo. It’s the secret ingredient that makes people ask, “What’s in these?”
Pipe, don’t spoon. Spooning the filling into the egg whites leaves messy edges and uneven portions. A piping bag gives you clean, professional-looking results with minimal effort. Plus, you can make fun swirls and peaks that look extra festive.
Chill before serving. Deviled eggs are best served cold. The filling firms up beautifully after 30 minutes in the fridge, making them easier to handle and more refreshing to eat. If you’re serving them at a party, keep the platter on ice or in the fridge until the last minute.
One more thing: if your filling is too thick, add a tiny splash of pickle brine or lemon juice. If it’s too thin, add a little more mayonnaise. You want it to be pipeable but not runny.
Variations & Adaptations
One of the best things about this recipe is how customizable it is. Here are some of my favorite variations:
Dietary Adaptations
Keto/Low-Carb: These are naturally low-carb, so no changes needed. Just skip the food coloring if you’re avoiding artificial additives, or use natural colorings like beet juice for red and spinach juice for green.
Dairy-Free: This recipe is already dairy-free! Just make sure your mayonnaise doesn’t contain dairy (most don’t).
Gluten-Free: All ingredients are naturally gluten-free. Double-check your mustard and mayonnaise labels to be safe.
Flavor Variations
Spicy Halloween: Add 1/2 teaspoon of cayenne pepper or a dash of hot sauce to the filling. Top with a thin slice of jalapeño for an extra kick. I call these “ghost pepper” eggs, and they’re always a hit.
Herb Garden: Stir in 2 tablespoons of finely chopped fresh dill, parsley, or chives. This gives the eggs a fresh, garden-fresh flavor that pairs beautifully with the smoky paprika.
Bacon Lover’s: Crumble cooked bacon over the top of the filled eggs before adding the spooky decorations. Because everything is better with bacon, right?
Seasonal Twists
Thanksgiving Leftovers: Skip the spooky decorations and top with a sprinkle of fresh herbs and a dash of extra paprika. These make a great addition to any holiday brunch.
Summer Picnic: Add a teaspoon of fresh lemon zest to the filling and top with a tiny sprig of dill. These are refreshing and bright for outdoor gatherings.
I once made a batch with smoked salmon folded into the filling for a New Year’s Eve party. They were gone before the champagne was poured. Don’t be afraid to experiment—deviled eggs are forgiving and versatile.
Serving & Storage Suggestions
These spooky deviled eggs are best served cold, straight from the fridge. Arrange them on a platter in a single layer—don’t stack them, or the filling will smush. I like to use a black slate board or a white ceramic platter to make the colors pop. If you’re serving them at a Halloween party, arrange them in a spider web pattern or around a small pumpkin centerpiece.
For presentation, garnish the platter with extra black olives, fresh herbs, or even candy eyeballs for a fun touch. You can also sprinkle a little extra smoked paprika over the top just before serving for a dramatic effect.
These pair beautifully with other party snacks like a crispy buffalo chicken dip, a smoky roasted red pepper hummus, or even a classic seven-layer dip. For drinks, a crisp white wine or a cold beer complements the richness of the eggs. Non-alcoholic options like sparkling water with lemon or a spooky punch work great too.
Storage Instructions
Store leftover deviled eggs in an airtight container in the refrigerator for up to 3 days. Place them in a single layer with paper towels between layers to absorb excess moisture. Do not freeze deviled eggs—the texture of the filling will become watery and grainy when thawed.
If you’re making these ahead of time, prepare the filling and egg whites separately. Store the whites in an airtight container with a damp paper towel on top to keep them from drying out. Pipe the filling and add decorations no more than 2 hours before serving for best results.
Pro tip: the flavors actually improve after a day in the fridge. The pickle brine and mustard meld with the yolks, creating a deeper, more complex flavor. So don’t be afraid to make these a day ahead!
Nutritional Information & Benefits
Here’s the approximate nutritional breakdown per deviled egg (based on 24 servings from 12 eggs):
- Calories: 85
- Protein: 6g
- Fat: 6g
- Carbohydrates: 1g
- Fiber: 0g
- Sugar: 0.5g
- Sodium: 180mg
Eggs are a fantastic source of high-quality protein, choline (important for brain health), and vitamin D. The mayonnaise adds healthy fats that help keep you full and satisfied. Pickle brine provides a small amount of electrolytes, which is great for hydration—especially if you’re drinking at a party!
This recipe is naturally low-carb, gluten-free, and dairy-free, making it suitable for a variety of dietary needs. If you’re watching your sodium intake, use low-sodium mayonnaise and skip the additional salt in the filling.
I personally love that these deviled eggs are a healthier option on a party table full of sugary treats and processed snacks. They’re satisfying, nutritious, and still feel indulgent. It’s the kind of food that makes you feel good about what you’re eating—even when they look like spiders.
Conclusion
Look, I get it—Halloween can be stressful. Between the costumes, the decorations, and the last-minute candy run, the last thing you need is a complicated appetizer. But these spooky deviled eggs are the exception. They’re simple enough to make on a busy weeknight, yet impressive enough to steal the show at any gathering. They’re the recipe that keeps me coming back year after year, and the one that made Rosa’s chipped bowl my most treasured kitchen tool.
I hope you’ll take this recipe and make it your own. Maybe you’ll add extra spice, or skip the food coloring, or invent a new spooky decoration that I haven’t thought of. That’s the beauty of cooking—it’s never the same twice. So go ahead, boil those eggs, pipe that filling, and watch your guests’ faces light up when they see a platter of spiders and monsters on the table.
If you make these, I’d love to hear about it. Drop a comment below and tell me how they turned out, or share a photo of your spooky creations. Don’t forget to pin this recipe for later, and check out my Halloween appetizer roundup for more party inspiration. Happy Halloween, and happy cooking!
Frequently Asked Questions
Can I make these deviled eggs a day ahead?
Absolutely! In fact, I recommend it. Prepare the filling and egg whites separately, then pipe and decorate no more than 2 hours before serving. The flavors actually deepen overnight, making them even more delicious.
How do I get perfectly peeled hard-boiled eggs?
Use older eggs (at least a week old), shock them in ice water immediately after boiling, and peel under running cold water. Adding a teaspoon of baking soda to the boiling water also helps loosen the shells.
Can I use a different type of mayonnaise?
Yes, but avoid Miracle Whip or other sweetened dressings—they’ll throw off the flavor balance. I recommend Duke’s or Hellmann’s for the creamiest texture. Vegan mayonnaise also works well if you need a plant-based option.
How long do these deviled eggs last in the fridge?
Stored in an airtight container, they’ll keep for up to 3 days. However, the decorations may start to bleed or smudge after 24 hours, so they’re best enjoyed within the first day.
Can I freeze deviled eggs?
No, I don’t recommend freezing deviled eggs. The filling becomes watery and grainy when thawed, and the egg whites turn rubbery. Stick to refrigerating them for best results.
PrintBest Easy Spooky Halloween Deviled Eggs Recipe
These spooky deviled eggs are creamy, tangy, and decorated with black olive spiders and paprika blood spatters. Perfect for Halloween parties, they’re quick to make and always a crowd-pleaser.
- Prep Time: 15 minutes
- Cook Time: 12 minutes
- Total Time: 27 minutes
- Yield: 24 deviled eggs 1x
- Category: Appetizer
- Cuisine: American
Ingredients
- 12 large eggs, room temperature
- 1/3 cup mayonnaise (Duke’s or Hellmann’s recommended)
- 1 tablespoon yellow mustard (or Dijon)
- 1 tablespoon pickle brine (from dill pickles)
- 1/2 teaspoon salt
- 1/4 teaspoon black pepper, freshly ground
- 1/4 teaspoon smoked paprika (plus more for garnish)
- 1 can (6 oz) black olives, drained and sliced
- Red food coloring (gel preferred)
- Green food coloring (optional)
- Purple food coloring (optional)
- Fresh chives or green onion tops, cut into small pieces
Instructions
- Place eggs in a large pot in a single layer. Cover with cold water by about an inch. Bring to a rolling boil over high heat (8-10 minutes). Once boiling, cover, turn off heat, and let sit for exactly 12 minutes.
- Prepare a bowl of ice water. Transfer eggs to ice water using a slotted spoon. Let sit for at least 5 minutes. Crack shells all over and peel under running cold water, starting from the wider end.
- Slice each peeled egg in half lengthwise. Remove yolks to a medium bowl. Arrange egg white halves on a serving platter, cut side up. Trim a tiny sliver off the bottom if needed for stability.
- Add mayonnaise, yellow mustard, pickle brine, salt, black pepper, and smoked paprika to the yolks. Mash with a fork, then transfer to a food processor. Pulse for about 30 seconds until silky smooth. Taste and adjust seasoning.
- If making colored eggs, divide filling into separate bowls. Add a few drops of food coloring to each and stir until evenly distributed.
- Spoon filling into a piping bag fitted with a star tip (or a zip-top bag with corner snipped). Pipe filling into each egg white half, creating a swirl or dollop. Do not overfill.
- For spider eggs: place two black olive slices on each egg for the body, cut thin strips from remaining olives for legs (four on each side). For blood spatter: dip a toothpick in red food coloring and flick over eggs. For eyeballs: place a small piece of green onion on top and dot center with red food coloring.
- Sprinkle a light dusting of smoked paprika over the eggs. Refrigerate for at least 30 minutes before serving. Serve cold.
Notes
Use older eggs for easier peeling. The pickle brine adds tang and helps emulsify the filling. For best results, pipe the filling rather than spooning it. The flavors improve after a day in the fridge.
Nutrition
- Serving Size: 1 deviled egg
- Calories: 85
- Sugar: 0.5
- Sodium: 180
- Fat: 6
- Saturated Fat: 1.5
- Carbohydrates: 1
- Protein: 6
Keywords: Halloween deviled eggs, spooky deviled eggs, deviled eggs recipe, Halloween appetizer, easy deviled eggs