The neighborhood block party was in less than two hours and I’d completely forgotten about bringing a dessert. Everyone else would be showing up with elaborate cakes or multi-layered pies that probably took days to prepare. I had… well, just a handful of summer berries, some cream cheese, and a vague hope that I could whip up something quick and tasty. Honestly, the panic was real. I mean, you know that feeling when your mind goes blank and your kitchen looks like a tornado hit it? That was me, juggling a cracked mixing bowl and a half-empty container of sour cream while the clock ticked closer to party time.
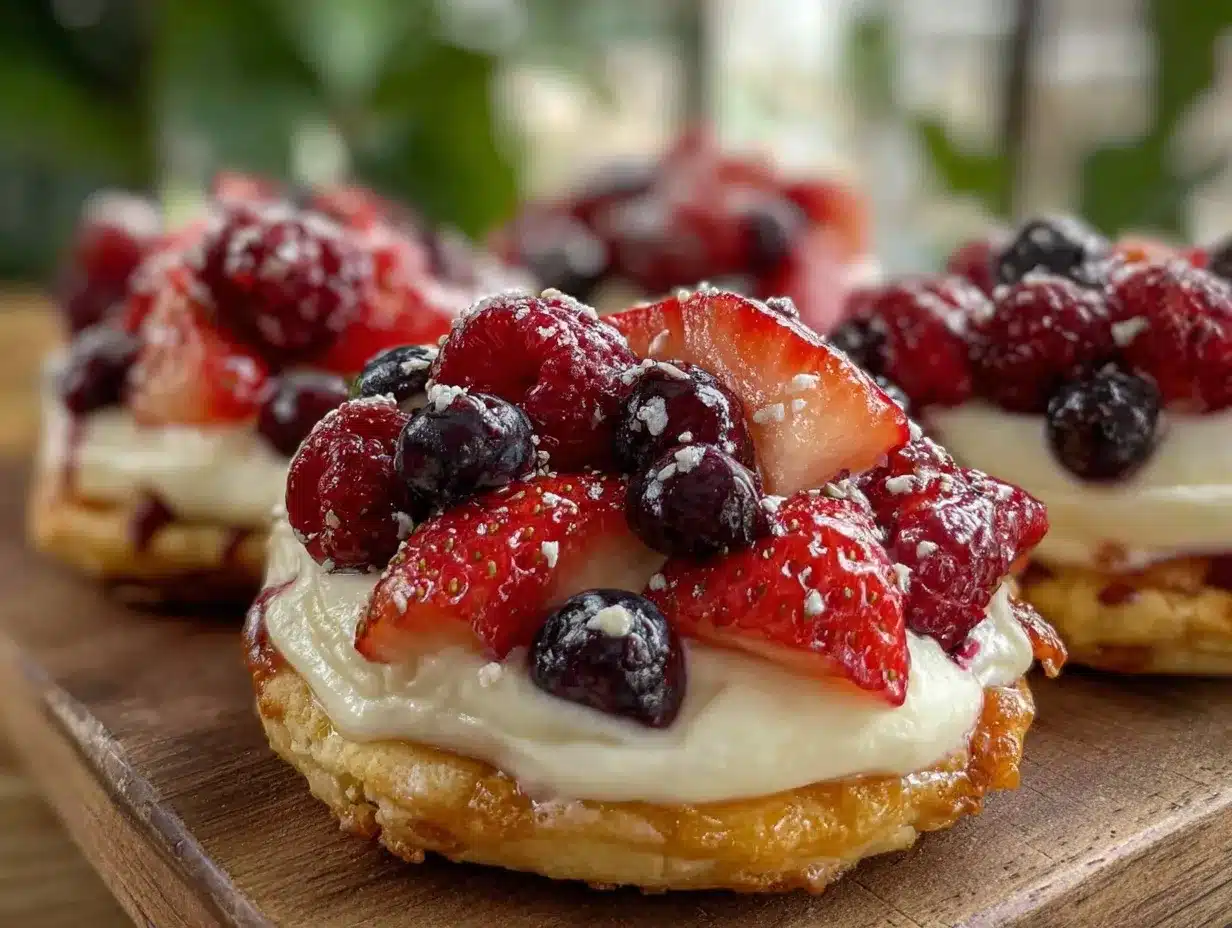
But then, something clicked. I decided to throw together these easy creamy individual mini fruit pizzas with summer berries—no fancy steps, no multi-day marinating. Just simple, fresh ingredients and a touch of creativity. I layered smooth, tangy cream cheese topping on tiny cookie crusts and crowned them with the freshest berries from my local farmers’ market. It wasn’t supposed to be a showstopper; it was supposed to be a last-minute save.
Yet, much to my surprise, these mini fruit pizzas stole the spotlight. The perfect balance of creamy sweetness and bright berry freshness won over the crowd. The recipe has stuck with me since—because, honestly, sometimes the best dishes are the ones you throw together under pressure. If you’ve ever found yourself scrambling for a dessert with barely any time, you might just find these mini fruit pizzas become your secret weapon too.
Why You’ll Love This Recipe
Let me tell you why this recipe for easy creamy individual mini fruit pizzas with summer berries has become a staple in my kitchen. It’s not just a quick fix; it’s a dessert that feels like a treat every single time. I’ve tested this recipe countless times, tweaking the creaminess and the crust texture until it was just right. Even my notoriously picky friends have asked for seconds.
- Quick & Easy: Ready in under 30 minutes, perfect for those hectic days or last-minute dessert needs.
- Simple Ingredients: Uses pantry staples and fresh summer berries—no complicated shopping required.
- Perfect for Entertaining: Ideal for potlucks, brunches, or casual backyard gatherings where individual servings are a plus.
- Crowd-Pleaser: The fresh berries and creamy topping combo is a hit with kids and adults alike.
- Unbelievably Delicious: The crisp cookie base contrasts beautifully with the luscious cream cheese layer and juicy, tart berries.
What sets this recipe apart is the creamy layer — it’s velvety smooth without being overly sweet, thanks to a subtle lemon zest and just the right amount of honey. Plus, the mini size means no fighting over the last slice! Honestly, this recipe feels like comfort food reimagined for summer—fresh, light, and effortlessly charming. Whether you’re rushing to a potluck or just craving a sweet bite, these mini fruit pizzas have you covered.
What Ingredients You Will Need
This recipe uses simple, wholesome ingredients to deliver bold flavor and satisfying texture without the fuss. Most of these might already be in your pantry or fridge, and fresh summer berries add that vibrant, juicy punch that’s hard to beat.
- For the Cookie Crust:
- 1 cup (125g) all-purpose flour (I like King Arthur brand for consistent texture)
- 1/4 cup (50g) granulated sugar
- 1/2 teaspoon baking powder
- 1/4 teaspoon salt
- 1/2 cup (115g) unsalted butter, cold and cubed (adds richness and flakiness)
- 1 large egg yolk (room temperature)
- 1 teaspoon vanilla extract
- For the Creamy Topping:
- 8 oz (225g) cream cheese, softened (use full-fat for best creaminess)
- 1/4 cup (60ml) sour cream or Greek yogurt (adds tang and smoothness)
- 1/3 cup (45g) powdered sugar
- 1 teaspoon lemon zest (brightens flavor)
- 1 teaspoon vanilla extract
- 1 tablespoon honey or maple syrup (optional, for a touch of sweetness)
- For the Topping:
- 1 1/2 cups mixed summer berries (fresh strawberries, blueberries, raspberries, blackberries)
- Fresh mint leaves for garnish (optional)
If you want to make this gluten-free, swapping the all-purpose flour for almond flour works well—though the texture shifts to a more tender cookie base. For dairy-free options, try using coconut cream cheese and coconut yogurt, but keep in mind the flavor profile will change slightly. In summer, I love grabbing berries from my local farmer’s market, but frozen berries can work in a pinch (just thaw and drain them well).
Equipment Needed
To make these easy creamy individual mini fruit pizzas with summer berries, you won’t need anything too fancy. Here’s what I found essential:
- Mixing Bowls: A couple of medium bowls for making the crust and the creamy topping separately.
- Pastry Cutter or Fork: For cutting cold butter into the flour mixture. A food processor works too if you have one handy.
- Measuring Cups and Spoons: Precision matters, especially for the cookie crust.
- Baking Sheet: For baking the mini cookie crusts.
- Parchment Paper or Silicone Baking Mat: Prevents sticking and makes cleanup a breeze.
- Electric Mixer or Hand Whisk: To whip the cream cheese mixture smooth and silky.
- Small Cookie Cutter or Glass: To shape the mini pizza bases (about 3 inches/7.5 cm diameter).
If you don’t have a pastry cutter, just use two knives or even your fingers—cold butter is key here! For budget-friendly baking, parchment paper is a must-have; it saves you from scrubbing cookie sheets later. Personally, I find an electric hand mixer makes the topping silky and lump-free every time, but a sturdy whisk can do the job if you don’t own one.
Preparation Method
- Prepare the Cookie Dough: In a medium bowl, whisk together 1 cup (125g) flour, 1/4 cup (50g) sugar, 1/2 teaspoon baking powder, and 1/4 teaspoon salt. Add the cold, cubed butter (1/2 cup/115g) and cut it into the dry ingredients using a pastry cutter or fork until the mixture resembles coarse crumbs. This step is crucial to get that perfect crumbly texture. (Tip: Keep butter cold to avoid greasy dough.)
- Add Wet Ingredients: Stir in 1 large egg yolk and 1 teaspoon vanilla extract until the dough starts to come together. If it feels too dry, add a teaspoon of cold water. Wrap the dough in plastic wrap and chill in the fridge for at least 30 minutes (or up to 2 hours). This resting period helps the dough firm up for easier rolling.
- Preheat Oven and Prepare Baking Sheet: Heat your oven to 350°F (175°C). Line a baking sheet with parchment paper or a silicone mat.
- Roll and Cut Dough: On a lightly floured surface, roll out the dough to about 1/4 inch (0.6 cm) thickness. Use a 3-inch (7.5 cm) cookie cutter or the rim of a glass to cut out rounds. Transfer these rounds to the baking sheet, spacing them about 1 inch apart.
- Bake the Cookie Crusts: Bake for 12-15 minutes, or until the edges turn a light golden brown. Watch closely near the end—overbaking can make them too hard. Let the crusts cool completely on the baking sheet before adding the topping.
- Make the Creamy Topping: In a mixing bowl, beat together 8 oz (225g) softened cream cheese, 1/4 cup (60ml) sour cream or Greek yogurt, 1/3 cup (45g) powdered sugar, 1 teaspoon lemon zest, 1 teaspoon vanilla extract, and 1 tablespoon honey until smooth and fluffy. Taste and adjust sweetness if needed.
- Assemble the Mini Fruit Pizzas: Using a small spatula or knife, spread a generous layer of the creamy topping onto each cooled cookie crust. Top with a colorful mix of fresh summer berries—strawberries, blueberries, raspberries, and blackberries all work beautifully.
- Garnish and Serve: Add a small mint leaf to each mini pizza for a fresh, fragrant touch. Serve immediately or chill for up to an hour to let the flavors meld.
Pro Tip: If your dough feels sticky when rolling, pop it back in the fridge for 10 minutes. Also, when spreading the topping, be gentle so you don’t break the delicate cookie bases. These little pizzas shine when you balance the crunchy base with creamy and juicy toppings.
Cooking Tips & Techniques
Getting these mini fruit pizzas just right is all about the details. Here are some tips I’ve picked up after a few messy attempts and happy successes:
- Cold Butter Is Key: For that tender and crumbly cookie crust, keep your butter cold and work quickly. Warm butter turns the dough greasy and tough.
- Don’t Overmix Dough: Mix just until ingredients come together. Overworking develops gluten and makes the crust chewy instead of crumbly.
- Watch Baking Time: The crusts should be lightly golden—overbaking dries them out. Keep an eye on the oven especially if your oven runs hot or uneven.
- Softened Cream Cheese: Make sure the cream cheese is softened to room temperature before mixing for a smooth, lump-free topping.
- Fresh Berries Only: The topping is simple, so the quality of berries matters. Pick ripe, firm berries to avoid a soggy pizza.
- Multitasking: Chill the dough while prepping your berries and mixing the topping to save precious time.
Once, I forgot to chill the dough properly, and the crust spread out too much in the oven—lesson learned! Also, I usually prepare the topping right before assembly to keep it fresh and creamy. This smart timing keeps flavors bright and textures perfect.
Variations & Adaptations
These mini fruit pizzas are incredibly adaptable, so you can tweak them to fit your needs or cravings:
- Gluten-Free Option: Swap the all-purpose flour for almond flour or a gluten-free baking mix. The texture will be a bit more tender but still delicious.
- Vegan Variation: Use dairy-free cream cheese and coconut yogurt, along with vegan butter for the crust. Maple syrup can replace honey.
- Seasonal Fruit Swaps: In cooler months, swap summer berries for poached pears, baked apples, or even pomegranate seeds for a festive touch.
- Flavored Creamy Toppings: Add a teaspoon of almond extract or a pinch of cinnamon to the cream cheese mixture for a unique twist.
- Chocolate Drizzle: For a decadent finish, drizzle melted dark chocolate over the assembled pizzas before serving.
Personally, I once tried a tropical version with mango and kiwi topped with shredded coconut — it was a sunny surprise! Feel free to experiment and make this recipe your own; it’s forgiving and fun.
Serving & Storage Suggestions
These mini fruit pizzas are best served chilled or at room temperature. The creamy topping tastes fresh and light when not too cold, while the cookie crust maintains a satisfying crunch.
- Serve them on a pretty platter with a few extra berries scattered around for color.
- Pair with a refreshing iced tea or a light sparkling wine for a summer gathering.
- Store leftovers in an airtight container in the refrigerator for up to 2 days. The crust may soften a bit but remains tasty.
- To re-crisp the cookie bases, you can briefly warm them in a toaster oven before adding fresh topping and berries again.
- Flavors tend to meld nicely if chilled for a short time before serving, but don’t let them sit too long or the crust will become soggy.
Nutritional Information & Benefits
Each mini fruit pizza offers a satisfying balance of carbs, fats, and protein with a generous serving of antioxidants from fresh berries. Estimated nutrition per mini pizza (based on 12 servings): approximately 150 calories, 7g fat, 18g carbs, 3g protein.
Key health benefits include the antioxidants and vitamin C from the berries, calcium and probiotics from the sour cream or Greek yogurt, and protein from the cream cheese. While these are treats, the recipe uses real, wholesome ingredients with no artificial additives.
If you’re mindful of gluten or dairy, the substitutions mentioned can make this dessert friendly for different dietary needs. It’s a dessert that feels indulgent without being over the top, perfect for anyone wanting a lighter sweet option.
Conclusion
These easy creamy individual mini fruit pizzas with summer berries are proof that you don’t need to spend hours in the kitchen to make something truly delicious. They blend simplicity, freshness, and a little bit of fun into every bite. Whether you’re rushing to a party or craving a sweet snack, this recipe is a reliable, crowd-pleasing winner.
Feel free to play with the toppings and flavors to suit your tastes—it’s flexible and forgiving! I keep coming back to this recipe because it’s quick, tasty, and brings smiles without the stress.
If you give it a try, please drop a comment and share how you made it your own. Happy baking and berry picking!
FAQs
- Can I make the cookie crust ahead of time? Yes, you can bake the crusts a day in advance and store them in an airtight container at room temperature.
- What if I don’t have fresh berries? Frozen berries can work if thawed and drained well, though fresh is best for texture.
- How do I prevent the crust from becoming soggy? Assemble just before serving and keep the crusts separate until ready to eat.
- Can I use other fruits besides berries? Absolutely! Peaches, kiwi, mango, or even pomegranate make great alternatives.
- Is there a dairy-free version? Yes, substitute dairy-free cream cheese and yogurt along with vegan butter for the crust.
Pin This Recipe!

Easy Creamy Mini Fruit Pizzas with Summer Berries

These easy creamy individual mini fruit pizzas with summer berries are a quick and delicious dessert featuring a crisp cookie crust, smooth cream cheese topping, and fresh summer berries. Perfect for last-minute gatherings and crowd-pleasing treats.
- Prep Time: 15 minutes
- Cook Time: 15 minutes
- Total Time: 30 minutes
- Yield: 12 servings 1x
- Category: Dessert
- Cuisine: American
Ingredients
- 1 cup (125g) all-purpose flour
- 1/4 cup (50g) granulated sugar
- 1/2 teaspoon baking powder
- 1/4 teaspoon salt
- 1/2 cup (115g) unsalted butter, cold and cubed
- 1 large egg yolk
- 1 teaspoon vanilla extract
- 8 oz (225g) cream cheese, softened
- 1/4 cup (60ml) sour cream or Greek yogurt
- 1/3 cup (45g) powdered sugar
- 1 teaspoon lemon zest
- 1 teaspoon vanilla extract
- 1 tablespoon honey or maple syrup (optional)
- 1 1/2 cups mixed summer berries (strawberries, blueberries, raspberries, blackberries)
- Fresh mint leaves for garnish (optional)
Instructions
- In a medium bowl, whisk together flour, sugar, baking powder, and salt.
- Add cold, cubed butter and cut into dry ingredients using a pastry cutter or fork until mixture resembles coarse crumbs.
- Stir in egg yolk and vanilla extract until dough starts to come together; add a teaspoon of cold water if too dry.
- Wrap dough in plastic wrap and chill in fridge for at least 30 minutes or up to 2 hours.
- Preheat oven to 350°F (175°C) and line a baking sheet with parchment paper or silicone mat.
- Roll dough on lightly floured surface to about 1/4 inch thickness and cut rounds with a 3-inch cookie cutter.
- Place rounds on baking sheet about 1 inch apart and bake for 12-15 minutes until edges are light golden brown.
- Let cookie crusts cool completely on baking sheet.
- In a mixing bowl, beat cream cheese, sour cream or Greek yogurt, powdered sugar, lemon zest, vanilla extract, and honey until smooth and fluffy.
- Spread a generous layer of creamy topping onto each cooled cookie crust.
- Top with mixed fresh summer berries.
- Garnish each mini pizza with a mint leaf if desired and serve immediately or chill up to an hour before serving.
Notes
Keep butter cold to ensure a tender, crumbly cookie crust. Chill dough before rolling to prevent spreading. Use fresh berries for best texture and flavor. Assemble just before serving to avoid soggy crusts. Frozen berries can be used if thawed and drained well.
Nutrition
- Serving Size: 1 mini fruit pizza
- Calories: 150
- Fat: 7
- Carbohydrates: 18
- Protein: 3
Keywords: mini fruit pizzas, summer berries, creamy dessert, quick dessert, easy fruit pizza, individual desserts, berry dessert