My niece Lily asked why I couldn’t just crush the cookies and press them into the pan without melting butter. I started to explain why that wouldn’t work—something about structure and crumb cohesion that I’d read in a baking textbook years ago. Then I stopped. She was seven, and honestly, I’d never actually tried it her way. So I handed her a rolling pin and a zip-top bag and let her go to town. Twenty minutes later, I was eating the best no-bake cheesecake base I’d ever made, and she was giving me that look kids give you when they’ve just proven you wrong. I mean, I’ve been developing recipes for over a decade, and a second-grader just taught me something about butter ratios.
That afternoon turned into a full-blown kitchen experiment. Lily wanted to use the Biscoff cookies she’d discovered at a friend’s birthday party—you know that feeling when a kid becomes obsessed with a specific snack and suddenly it’s all they talk about? She’d smuggled a package home in her backpack, and I figured we’d give it a shot. The result was so ridiculously good that I texted a photo to my sister, who asked if I’d finally lost my mind putting cookies in cheesecake. Well, maybe I have, but these no-bake Biscoff cheesecake bars are proof that sometimes the best recipes come from letting someone else take the lead.
The thing that stuck with me wasn’t just how good they tasted—it was how simple the whole process felt. No oven, no water bath, no stress about cracks or over-baking. Just a few ingredients, a bit of patience while they chilled, and dessert that made everyone at the dinner table close their eyes on the first bite. Lily’s been asking to make them every weekend since, and honestly, I don’t mind one bit.
Why You’ll Love This Recipe
Let me tell you why these no-bake Biscoff cheesecake bars have become the most-requested dessert in my house. First off, they’re genuinely foolproof. I’ve tested this recipe with my niece, with a group of eight-year-olds at a birthday party, and with my notoriously picky mother-in-law. Every single time, they came out perfect. No cracks, no sinking, no weird texture issues—just creamy, cookie-packed goodness that sets up beautifully in the fridge.
- Quick & Easy: From start to fridge in under twenty minutes. That’s faster than driving to the store for a frozen cheesecake.
- Simple Ingredients: You probably have cream cheese and sugar in your fridge right now. The Biscoff cookies and spread are the only specialty items, and they’re easy to find at most grocery stores.
- Perfect for Family Desserts: These bars are great for weeknight treats, school bake sales, or when you need something impressive for a potluck without turning on the oven.
- Crowd-Pleaser: Kids love the cookie crunch, and adults appreciate that it’s not too sweet. I’ve watched teenagers demolish a whole pan in one sitting.
- Unbelievably Delicious: The combination of creamy cheesecake filling with that spiced Biscoff flavor is honestly addictive. The texture is silky but firm enough to hold its shape when you cut it.
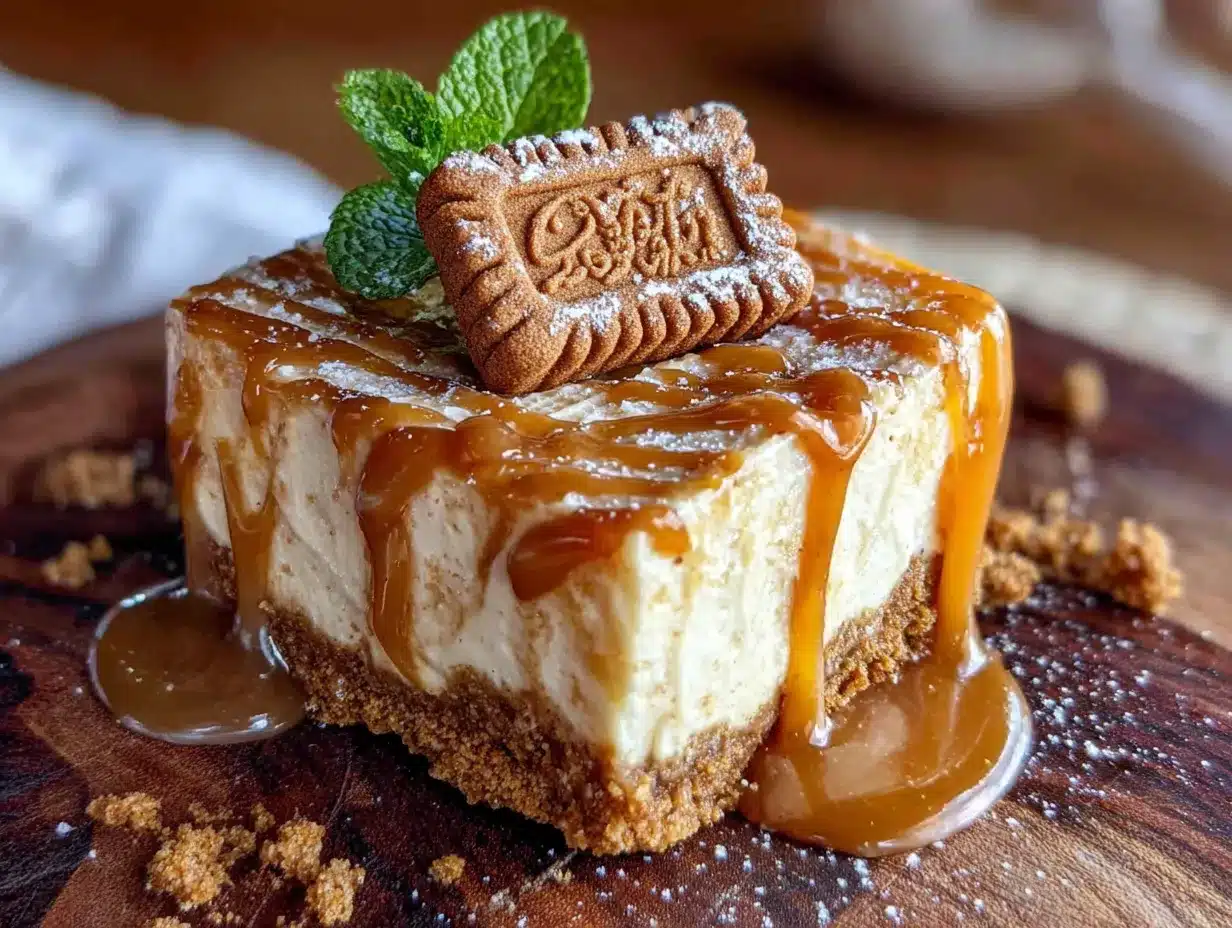
What makes these bars different from other no-bake cheesecake recipes is the technique I learned from Lily’s butter-free crust experiment. By crushing the cookies finely and pressing them firmly, you get a crust that holds together without being greasy or heavy. The filling uses a clever ratio of cream cheese to heavy cream that gives you that perfect sliceable texture without needing gelatin. And the Biscoff spread swirl on top? That’s pure genius—it adds a caramelized richness that makes these taste like you spent hours in the kitchen.
This is the kind of recipe that makes you feel like a hero. It’s comfort food reimagined—simpler, faster, but with the same soul-soothing satisfaction as a classic cheesecake. Perfect for impressing guests without stress, or turning a regular Tuesday into something memorable.
What Ingredients You Will Need
This recipe uses simple, wholesome ingredients to deliver bold flavor and satisfying texture without the fuss. Most of these are pantry staples or easy to find at any grocery store.
For the Crust
- Biscoff cookies, 200g (about 2 cups crushed) — These are the star of the show. I recommend the Lotus brand for that authentic spiced flavor. You can also use speculoos cookies if you find them.
- Unsalted butter, 60g (¼ cup), melted — Adds richness and helps the crust hold together. If you use salted butter, skip the extra salt.
- Granulated sugar, 2 tablespoons (25g) — Just a touch to balance the spices. Optional if your cookies are already sweet enough.
For the Cheesecake Filling
- Full-fat cream cheese, 450g (2 blocks), softened to room temperature — This is non-negotiable for that creamy texture. Low-fat cream cheese will make the filling runny.
- Powdered sugar, 100g (¾ cup) — Dissolves easily and gives a smooth finish without graininess.
- Heavy cream, 240ml (1 cup), cold — Whipped into soft peaks to give the filling structure. Don’t substitute with milk or half-and-half.
- Vanilla extract, 1 teaspoon — Enhances the overall flavor profile.
- Biscoff spread, 120g (½ cup), plus extra for swirling — This is the cookie butter that takes the filling to another level. I use the smooth version for best results.
For the Topping
- Biscoff spread, 60g (¼ cup), warmed slightly — For that beautiful swirl on top. You can also drizzle it straight from the jar if it’s room temperature.
- Crushed Biscoff cookies, 2 tablespoons — For garnish and crunch.
- Optional: flaky sea salt — A tiny sprinkle on top balances the sweetness beautifully. Trust me on this one.
When selecting your cream cheese, look for blocks rather than the spreadable tub version. The blocks have a firmer texture that whips up better. For the Biscoff spread, I’ve tried both the crunchy and smooth versions—smooth works better for the filling, but crunchy is lovely as a garnish on top.
If you’re dairy-sensitive, you can use dairy-free cream cheese and coconut cream instead of heavy cream. Just note that the texture will be slightly softer, so you might need an extra hour of chilling time.
Equipment Needed
You don’t need much for these no-bake Biscoff cheesecake bars, which is part of their charm.
- 8×8-inch baking pan — This is the perfect size for thick, satisfying bars. A 9×9-inch pan works too, but your bars will be slightly thinner.
- Parchment paper — Essential for easy removal. Let some hang over the edges as handles.
- Mixing bowls — One large for the filling, one medium for the crust.
- Electric hand mixer or stand mixer — You can whip the cream by hand, but your arm will thank you for using a mixer.
- Rolling pin or food processor — For crushing the cookies. A zip-top bag and a rolling pin work great if you want to involve kids.
- Spatula — For spreading and smoothing the filling.
- Measuring cups and spoons — Precision matters for the cream cheese to sugar ratio.
I’ve used both glass and metal pans, and both work fine. The key is lining it well with parchment so you can lift the whole thing out for clean slicing. If you don’t have a food processor, don’t worry—I actually prefer the texture you get from crushing cookies by hand. It’s more rustic and gives the crust a nice variation in crumb size.
Preparation Method
Let me walk you through this step by step. The whole active time is about twenty minutes, then you just need patience while it chills.
Step 1: Prepare the Pan
Line your 8×8-inch baking pan with parchment paper, leaving about 2 inches hanging over two opposite sides. These will be your handles for lifting the finished cheesecake out. Set the pan aside while you work on the crust.
Step 2: Make the Crust
Place the Biscoff cookies in a zip-top bag and crush them with a rolling pin until you have fine crumbs with a few slightly larger pieces for texture. You want about 2 cups of crumbs total. Transfer to a medium bowl, add the melted butter and sugar, and stir until everything is evenly moistened. The mixture should hold together when you squeeze a handful. Press this mixture firmly into the bottom of your prepared pan. I use the bottom of a measuring cup to really pack it down. Pop this in the fridge while you make the filling.
Step 3: Whip the Cream
In a large mixing bowl, pour the cold heavy cream. Using an electric mixer on medium-high speed, whip until soft peaks form—this takes about 3-4 minutes. You’ll know it’s ready when the cream holds its shape when you lift the beaters, but the peaks droop slightly. Be careful not to over-whip, or you’ll end up with butter. Set this aside in the fridge while you work on the cream cheese mixture.
Step 4: Make the Cheesecake Filling
In another large bowl, beat the softened cream cheese with an electric mixer on medium speed until smooth and creamy, about 2 minutes. Add the powdered sugar and vanilla extract, and beat until fully combined and fluffy, another 2 minutes. Scrape down the sides of the bowl with a spatula. Add the Biscoff spread and beat on low speed until just incorporated—you don’t want to over-mix at this point.
Step 5: Fold Everything Together
Take the whipped cream out of the fridge. Using a spatula, gently fold about one-third of the whipped cream into the cream cheese mixture to lighten it. Then add the remaining whipped cream and fold until no white streaks remain. The mixture should be smooth, airy, and uniform in color. Don’t stir vigorously—you want to keep all that air you whipped in.
Step 6: Assemble the Bars
Remove the crust from the fridge. Spoon the cheesecake filling over the crust and spread it evenly with a spatula. Give the pan a few gentle taps on the counter to release any air bubbles. For the swirl, warm the remaining Biscoff spread in the microwave for about 15 seconds until it’s drizzle-able. Drop spoonfuls over the top of the filling, then use a knife or toothpick to swirl it into a marbled pattern. Don’t over-swirl, or you’ll lose the distinct ribbons of cookie butter.
Step 7: Chill and Set
Cover the pan with plastic wrap and refrigerate for at least 6 hours, but overnight is better. The filling needs time to firm up completely. I’ve made the mistake of cutting into these too early, and let me tell you, it’s a messy disappointment. Patience pays off here.
Step 8: Slice and Serve
Once fully set, use the parchment handles to lift the entire block out of the pan. Place it on a cutting board and use a sharp knife to cut into 16 squares. For clean slices, wipe the knife clean between cuts. Sprinkle with crushed Biscoff cookies and a tiny pinch of flaky sea salt if you’re feeling fancy. Serve cold straight from the fridge.
Cooking Tips & Techniques
I’ve made these no-bake Biscoff cheesecake bars about a dozen times now, and I’ve picked up a few tricks along the way.
Room temperature cream cheese is essential. I know it’s tempting to use it straight from the fridge, but cold cream cheese will give you lumpy filling. Take it out about an hour before you start. If you forget, you can microwave it in 10-second bursts, but be careful not to melt it.
Don’t skip the parchment paper. I once tried to be clever and just grease the pan. Big mistake. The cheesecake stuck to the sides, and I ended up with a crumbled mess trying to get it out. The parchment handles make life so much easier.
Crush the cookies evenly. If you have large chunks in the crust, they won’t bind as well, and your crust might crumble when you cut the bars. I like to put the cookies in a food processor for a few pulses, then transfer to a bag and crush a bit more by hand for texture.
Whip the cream to the right stage. Soft peaks are perfect for this recipe. If you under-whip, the filling won’t set properly. If you over-whip, you’ll have a grainy texture. Watch for the cream to thicken and hold a gentle peak that flops over slightly.
Chill overnight for best results. I know six hours seems like forever, but overnight is truly better. The flavors meld, the texture firms up perfectly, and the bars slice like a dream. I’ve learned this the hard way—cutting into them after four hours resulted in a delicious but messy puddle.
Use a warm knife for clean cuts. Run your knife under hot water, dry it, then slice. The warmth helps the knife glide through the filling without dragging. Wipe the blade clean between each cut for those picture-perfect squares.
Variations & Adaptations
One of the best things about this recipe is how easy it is to adapt. Here are some variations I’ve tried and loved.
Chocolate Biscoff Bars
Add 60g (¼ cup) of melted dark chocolate to the cream cheese mixture before folding in the whipped cream. The chocolate pairs beautifully with the spiced cookie flavor. I made this version for a friend’s birthday, and she said it was the best dessert she’d had all year.
Gluten-Free Version
Most Biscoff cookies are already gluten-free, but double-check the package. Use gluten-free graham crackers or digestive biscuits for the crust if you want to be extra safe. The filling is naturally gluten-free, so this adaptation is incredibly simple.
Vegan Option
Use dairy-free cream cheese (I like the Violife or Kite Hill brands) and coconut cream instead of heavy cream. Chill the can of coconut cream overnight, then scoop out the solid part and whip it. The texture will be slightly softer, so add an extra hour of chilling time. The Biscoff spread is vegan-friendly, so you’re good there.
Mini Cheesecake Cups
Instead of a pan, press the crust into the bottom of 12 paper-lined muffin cups. Divide the filling evenly and chill as directed. These are perfect for parties or lunchbox treats. They set faster too—about 4 hours should do it.
Pumpkin Spice Twist
Add 120g (½ cup) of pumpkin puree and 1 teaspoon of pumpkin pie spice to the cream cheese mixture. Reduce the Biscoff spread to 60g (¼ cup) to balance the flavors. This fall version is absolutely gorgeous with a drizzle of caramel on top.
Serving & Storage Suggestions
These no-bake Biscoff cheesecake bars are best served cold, straight from the refrigerator. The texture is at its peak when they’re thoroughly chilled—creamy, firm, and sliceable. I like to let them sit at room temperature for about 5 minutes before serving, which takes the edge off the cold without compromising the structure.
For presentation, arrange the bars on a platter and garnish with extra crushed Biscoff cookies, a drizzle of melted Biscoff spread, and maybe a few fresh berries for color. They look stunning on a dessert table alongside other finger foods.
Storage: Keep the bars in an airtight container in the refrigerator for up to 5 days. Place parchment paper between layers if you’re stacking them to prevent sticking. The flavors actually deepen after a day or two, so don’t be surprised if they taste even better on day three.
Freezing: These freeze beautifully. Wrap individual bars in plastic wrap, then place them in a freezer-safe bag or container. They’ll keep for up to 3 months. To thaw, transfer to the refrigerator overnight. I keep a stash in my freezer for unexpected guests or late-night cravings.
Reheating notes: Don’t reheat these—they’re meant to be enjoyed cold. If you want a warm dessert, try the Biscoff spread drizzle warmed up separately and poured over a cold bar. The contrast of warm and cold is delightful.
The flavors develop beautifully over time. The Biscoff spice becomes more pronounced, and the filling gets even creamier. I actually prefer these on day two, when everything has had time to meld together.
Nutritional Information & Benefits
Here’s the approximate nutritional breakdown for one bar (based on 16 servings):
- Calories: 285
- Fat: 19g
- Carbohydrates: 26g
- Protein: 4g
- Sugar: 18g
While these are definitely a treat, there are some redeeming qualities. The cream cheese provides calcium and protein, and the Biscoff cookies contain a bit of fiber from the wheat flour. The portion-controlled bar format makes it easier to enjoy dessert without overindulging.
For those watching their sugar intake, you can reduce the powdered sugar to 60g (½ cup) and use a sugar-free Biscoff spread alternative. The texture will be slightly less creamy, but the flavor will still be fantastic.
This recipe is vegetarian-friendly and can be made gluten-free and vegan with the substitutions mentioned above. It contains dairy and wheat (from the cookies), so keep that in mind for allergy considerations.
I believe in balance—these bars are a special treat, not an everyday snack. But honestly, sometimes a little indulgence is exactly what you need. Life is short, eat the cheesecake.
Frequently Asked Questions
Can I use a different cookie for the crust?
Absolutely! Graham crackers, digestive biscuits, or vanilla wafers all work well. The flavor will change, but the texture will be similar. If you use something less sweet than Biscoff, you might want to add an extra tablespoon of sugar to the crust.
Why is my cheesecake filling runny?
This usually happens for one of three reasons: your cream cheese was too cold and not fully beaten, your cream was under-whipped, or you didn’t chill the bars long enough. Make sure everything is at the right temperature and give it the full overnight chill. If it’s still runny after 8 hours, you might have over-mixed the filling, which can break down the structure.
Can I make these in a different size pan?
Yes, but you’ll need to adjust the quantities. A 9×9-inch pan will give you thinner bars—reduce the crust by about 25% and keep the filling the same. A 9×13-inch pan would need a double batch of everything. Just remember that the chilling time might change with different thicknesses.
How do I get clean, sharp slices?
Use a sharp knife and run it under hot water before each cut. Wipe the blade clean between slices. For the most professional look, chill the bars for the full overnight period and cut them while they’re still cold. If the bars start to soften as you work, pop them back in the fridge for 10 minutes.
Can I use homemade cookie butter instead of Biscoff spread?
You can, but it won’t be exactly the same. Homemade cookie butter tends to be oilier and might not incorporate as smoothly. If you want to make your own, blend Biscoff cookies with a bit of coconut oil until smooth. The flavor will be spot-on, but the texture might be slightly different.
Conclusion
These no-bake Biscoff cheesecake bars have become a staple in my kitchen, and I hope they become one in yours too. They’re proof that you don’t need an oven, fancy equipment, or hours of free time to make something truly special. The combination of that spiced cookie crust, creamy filling, and luscious swirl is honestly addictive—in the best way possible.
What I love most about this recipe is how adaptable it is. You can dress it up for a dinner party or keep it simple for a Tuesday night treat. You can involve the kids in crushing the cookies and swirling the top. You can make it your own with different toppings or variations. That’s the beauty of a good base recipe—it becomes a canvas for your creativity.
So go ahead, give these a try. Let your kids crush the cookies, or don’t. Use a different cookie, or stick with the classic Biscoff. Make them for a birthday, a potluck, or just because it’s Wednesday. And when you take that first bite and close your eyes, remember that sometimes the best recipes come from being open to a new idea—even if it comes from a seven-year-old with a rolling pin and a stubborn streak.
I’d love to hear how yours turn out! Drop a comment below and let me know what variations you tried, or tag me in your photos on social media. Happy no-baking, friends!
PrintEasy No-Bake Biscoff Cheesecake Bars: Kid-Approved
These no-bake Biscoff cheesecake bars are creamy, cookie-packed, and incredibly easy to make. A buttery Biscoff crust, silky cheesecake filling, and a luscious cookie butter swirl come together in under 20 minutes of active time—no oven required.
- Prep Time: 20 minutes
- Cook Time: 0 minutes
- Total Time: 6 hours 20 minutes (includes chilling)
- Yield: 16 servings 1x
- Category: Dessert
- Cuisine: American
Ingredients
- For the Crust:
- 200g (about 2 cups crushed) Biscoff cookies (Lotus brand recommended)
- 60g (¼ cup) unsalted butter, melted
- 2 tablespoons (25g) granulated sugar (optional, if cookies are sweet enough)
- For the Cheesecake Filling:
- 450g (2 blocks) full-fat cream cheese, softened to room temperature
- 100g (¾ cup) powdered sugar
- 240ml (1 cup) heavy cream, cold
- 1 teaspoon vanilla extract
- 120g (½ cup) Biscoff spread (smooth), plus extra for swirling
- For the Topping:
- 60g (¼ cup) Biscoff spread, warmed slightly
- 2 tablespoons crushed Biscoff cookies
- Optional: flaky sea salt
Instructions
- Line an 8×8-inch baking pan with parchment paper, leaving about 2 inches overhanging on two opposite sides for handles.
- Make the crust: Place Biscoff cookies in a zip-top bag and crush with a rolling pin into fine crumbs with some larger pieces. Transfer to a medium bowl, add melted butter and sugar, and stir until evenly moistened. Press firmly into the bottom of the prepared pan using the bottom of a measuring cup. Refrigerate while making the filling.
- Whip the cream: In a large bowl, beat cold heavy cream with an electric mixer on medium-high speed until soft peaks form (about 3-4 minutes). Refrigerate until needed.
- Make the cheesecake filling: In another large bowl, beat softened cream cheese on medium speed until smooth and creamy (about 2 minutes). Add powdered sugar and vanilla extract, beat until fluffy (another 2 minutes). Add Biscoff spread and beat on low until just incorporated.
- Fold: Gently fold one-third of the whipped cream into the cream cheese mixture to lighten it, then fold in the remaining whipped cream until no white streaks remain. The mixture should be smooth and airy.
- Assemble: Remove crust from fridge. Spoon filling over crust and spread evenly. Tap pan gently on counter to release air bubbles. Warm remaining Biscoff spread for about 15 seconds in microwave until drizzle-able. Drop spoonfuls over filling and swirl with a knife or toothpick into a marbled pattern.
- Chill: Cover with plastic wrap and refrigerate for at least 6 hours, preferably overnight, until fully set.
- Slice and serve: Use parchment handles to lift the block out of the pan. Place on a cutting board and cut into 16 squares with a sharp knife (wipe blade clean between cuts). Sprinkle with crushed Biscoff cookies and a pinch of flaky sea salt if desired. Serve cold.
Notes
Room temperature cream cheese is essential for a smooth filling. Don’t skip the parchment paper for easy removal. Crush cookies evenly for a stable crust. Whip cream to soft peaks only—under-whipping causes runny filling, over-whipping makes it grainy. Chill overnight for best texture and flavor. Use a warm knife for clean slices. Bars keep in the fridge for up to 5 days or freeze for up to 3 months.
Nutrition
- Serving Size: 1 bar
- Calories: 285
- Sugar: 18
- Sodium: 180
- Fat: 19
- Saturated Fat: 11
- Carbohydrates: 26
- Fiber: 1
- Protein: 4
Keywords: no-bake cheesecake, Biscoff cheesecake bars, cookie butter cheesecake, easy dessert, kid-friendly, no-bake dessert, cheesecake bars