My niece Clara asked why I couldn’t just use a drinking glass to cut out the cookie shapes. I was in the middle of explaining that cookie cutters exist for a reason—that a glass would leave the edges too ragged, that the dough would stick, that the shapes wouldn’t be defined enough for decorating. I started listing all the reasons it wouldn’t work, the way you do when you’ve been baking long enough to think you know everything. Then I stopped. Honestly, I stopped because I was tired. It was a Tuesday night in late October, the kitchen was already a disaster of flour and sprinkles, and I just didn’t have the energy to argue. So I handed her the glass. “Fine,” I said, “show me.” She pressed the rim into the chilled dough, twisted gently, and lifted. The circle was perfect. Clean edges, even thickness, not a single ragged bit. Then she took a small knife and cut two little triangles from the top for ears. And just like that—my niece had made a black cat cookie without a single specialty cutter. I stood there, flour on my apron, holding my expensive set of Halloween cookie cutters, and I had to admit she was right. Sometimes the simplest tools make the best shapes. That night, we made a whole sheet of those cats, and they came out better than any of my carefully planned batches. Maybe you’ve been there—so focused on doing things the “right” way that you miss the obvious solution sitting right in front of you. These spooky black cat sugar cookies became our Halloween tradition that night, and I keep making them because they remind me that baking doesn’t need to be complicated. Sometimes it just needs a kid with a glass and a good idea.
Why You’ll Love This Recipe
These spooky black cat sugar cookies are everything you want in a Halloween treat. They’re simple enough to make with kids, but impressive enough to bring to any Halloween party. Let me tell you what makes them so special.
- No Special Cutters Needed – You can shape these cats with a drinking glass and a knife. No hunting down expensive Halloween cookie cutters.
- Perfectly Soft with Crisp Edges – The texture is just right. Soft in the center with a slight crunch on the edges. The kind of cookie that disappears from the plate.
- Fun for All Ages – Kids love shaping the ears and piping the faces. Adults love how cute they turn out. It’s a crowd-pleaser across the board.
- Make-Ahead Friendly – The dough freezes beautifully, and the decorated cookies stay fresh for days. Perfect for Halloween week when you’re juggling a million things.
- Fully Customizable – Make them gluten-free, add different colors, or switch up the expressions on the faces. Every batch can be different.
What sets these apart from other sugar cookie recipes is the combination of almond and vanilla extracts. It gives the cookies a subtle, almost nutty sweetness that pairs perfectly with the dark cocoa in the royal icing. I tested this recipe six times before I got the balance right—the first batch was too bland, the second too sweet, the third had the wrong texture. But this version? This is the one. It’s the kind of cookie that makes you close your eyes after the first bite. Comfort food reimagined for Halloween, with the same soul-soothing satisfaction as your favorite sugar cookies, but with a spooky twist.
What Ingredients You Will Need
This recipe uses simple, wholesome ingredients to deliver bold flavor and satisfying texture without the fuss. Most of these are pantry staples, which makes these cookies perfect for last-minute Halloween baking.
- Unsalted Butter, softened (1 cup / 226g) – I always use unsalted to control the salt level. Let it sit at room temperature for about an hour before starting. Cold butter won’t cream properly and will leave you with dense, flat cookies.
- Granulated Sugar (1 cup / 200g) – Regular white sugar gives these cookies their tender crumb. Don’t substitute with brown sugar here—it changes the texture and color.
- Large Egg (1, room temperature) – Room temperature eggs incorporate better into the butter-sugar mixture. If you forget to take it out ahead of time, place it in a bowl of warm water for 5 minutes.
- Vanilla Extract (1 teaspoon) – Pure vanilla extract makes a difference. I prefer Nielsen-Massey for its rich, floral notes, but any good quality brand works.
- Almond Extract (½ teaspoon) – This is the secret ingredient. It adds a subtle, nutty undertone that makes these cookies taste bakery-quality. Don’t skip it.
- All-Purpose Flour (2½ cups / 312g) – Spoon and level your flour. Scooping directly from the bag packs in too much flour and makes dry cookies.
- Baking Powder (1 teaspoon) – Make sure it’s fresh. Test it by dropping a bit into hot water—if it fizzes, it’s good.
- Salt (½ teaspoon) – Fine sea salt works best. It balances the sweetness and enhances the other flavors.
- Black Gel Food Coloring (1-2 teaspoons) – Liquid food coloring won’t give you that deep, spooky black. Gel coloring is concentrated and won’t thin out your dough. I recommend AmeriColor Super Black.
For the Royal Icing:
- Powdered Sugar (2 cups / 240g) – Sift it first to avoid lumps in your icing.
- Meringue Powder (2 tablespoons) – This gives the icing structure and helps it dry hard. You can substitute with 2 large egg whites, but meringue powder is more stable and safer for kids.
- Water (3-4 tablespoons) – Add slowly. You want a consistency that holds a ribbon for a few seconds before sinking back into the bowl.
- Black Gel Food Coloring (1 teaspoon) – For the icing. You’ll also need a tiny bit of white icing for the eyes.
Ingredient Tips: For the blackest cookies, let the colored dough rest for 30 minutes. The color deepens as it sits. If you’re making these gluten-free, use a 1:1 gluten-free baking flour blend—I’ve had good results with King Arthur Measure for Measure. For a dairy-free version, substitute the butter with a high-quality vegan butter stick, not the spreadable kind in a tub.
Equipment Needed
You don’t need much for these cookies, which is part of their charm. Here’s what you’ll need:
- Mixing Bowls – One large bowl for the dough, one medium bowl for the icing.
- Electric Mixer – A hand mixer or stand mixer works. You need to cream the butter and sugar until light and fluffy, which takes about 3 minutes of beating.
- Rolling Pin – I prefer a French rolling pin without handles for better control. If you don’t have one, a wine bottle works in a pinch.
- Drinking Glass – For cutting the circles. Choose one with a thin rim for cleaner edges.
- Small Knife – For cutting the ear triangles. A paring knife works perfectly.
- Baking Sheets – Two sheets lined with parchment paper or silicone baking mats.
- Piping Bags – Small piping bags or zip-top bags with the corner snipped off for the royal icing.
- Cooling Rack – Wire racks let air circulate so your cookies cool evenly.
Budget-Friendly Tip: Skip the fancy cookie cutters. The drinking glass and knife method works perfectly and costs nothing. I’ve been using the same glass for three Halloweens now—it’s the one with the chipped rim that I keep meaning to throw away. Somehow it makes the best circles.
Preparation Method
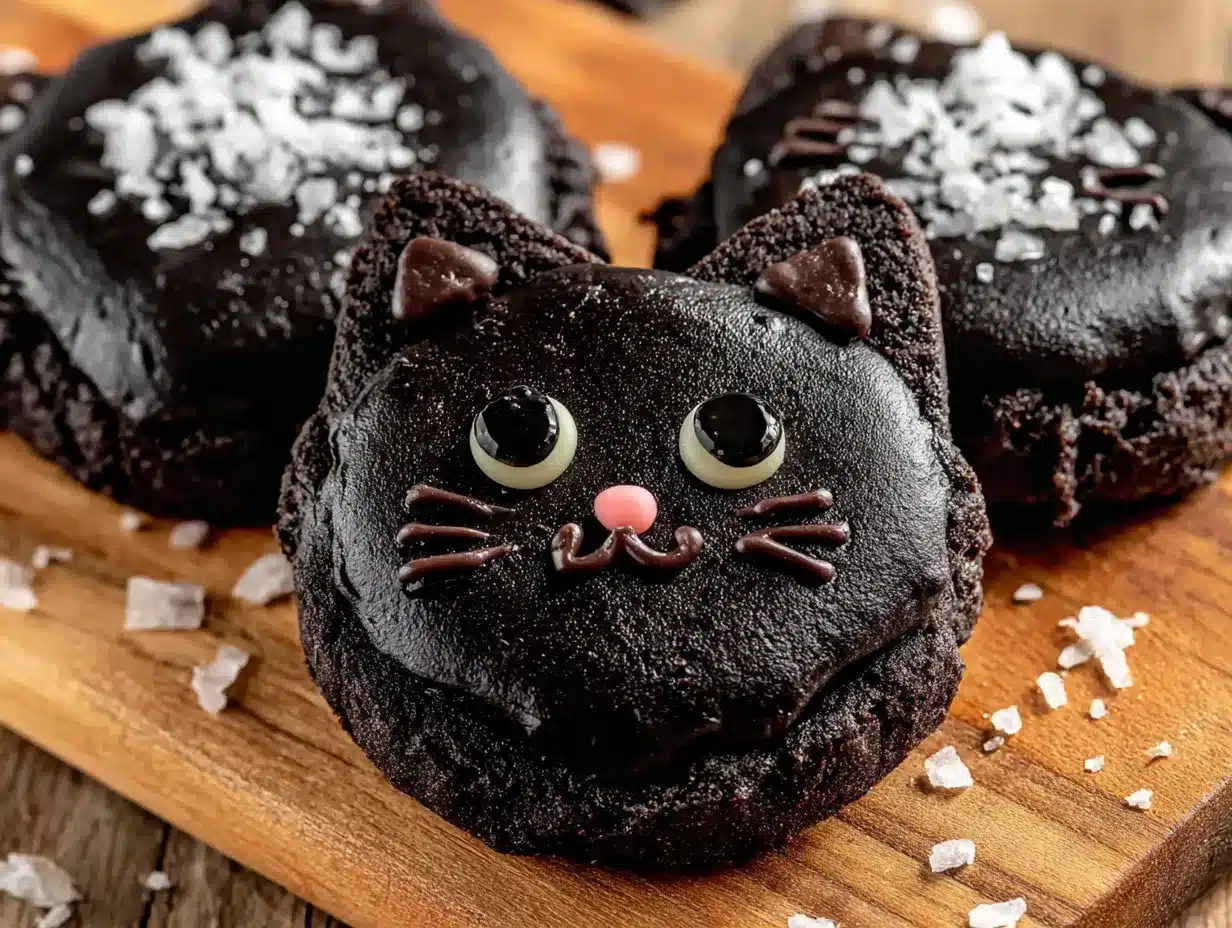
Let’s make these spooky black cat sugar cookies. Take your time with each step, and don’t rush the chilling stages. Trust me, it makes all the difference.
- Cream the Butter and Sugar – In a large mixing bowl, beat 1 cup of softened butter with 1 cup of granulated sugar until light and fluffy. This takes about 3 minutes on medium speed. You’ll know it’s ready when the mixture looks pale and almost whipped. Scrape down the sides of the bowl halfway through.
- Add the Wet Ingredients – Beat in 1 large egg, 1 teaspoon of vanilla extract, and ½ teaspoon of almond extract. Mix until just combined. Don’t overbeat here—you don’t want to incorporate too much air.
- Mix the Dry Ingredients – In a separate bowl, whisk together 2½ cups of all-purpose flour, 1 teaspoon of baking powder, and ½ teaspoon of salt. Whisking aerates the flour and distributes the leavening evenly.
- Combine Wet and Dry – Gradually add the dry ingredients to the wet mixture, mixing on low speed. Stop when the dough just comes together. It should look shaggy but hold together when pressed.
- Add the Black Food Coloring – Add 1-2 teaspoons of black gel food coloring and mix on low until the color is evenly distributed. The dough will look gray at first—don’t panic. It darkens as it sits. If you want deeper color, add more gel coloring a few drops at a time.
- Chill the Dough – Divide the dough into two discs, wrap each in plastic wrap, and refrigerate for at least 1 hour. This is non-negotiable. Chilled dough doesn’t spread, and it makes shaping the ears much easier. I’ve skipped this step before, and my cats came out looking more like blobs than cats.
- Preheat the Oven – Preheat your oven to 350°F (175°C). Line two baking sheets with parchment paper.
- Roll Out the Dough – On a lightly floured surface, roll one disc of dough to about ¼-inch thickness. Keep the surface and rolling pin lightly floured to prevent sticking. If the dough cracks at the edges, let it sit at room temperature for 5 minutes to warm up slightly.
- Cut the Circles – Use a drinking glass to cut circles from the dough. Press straight down and lift—don’t twist, or the edges will seal and the cookies won’t spread evenly. Gather the scraps, re-roll, and cut more circles.
- Shape the Ears – With a small knife, cut two small triangles from the top of each circle to form cat ears. Angle the cuts slightly inward for a more natural cat-head shape. Remove the excess dough from between the ears and add it to your scrap pile.
- Bake the Cookies – Place the shaped cookies 2 inches apart on the prepared baking sheets. Bake for 8-10 minutes, rotating the pans halfway through. The cookies are done when the edges are just barely golden. They will look slightly underdone in the center—that’s perfect. Let them cool on the baking sheet for 5 minutes, then transfer to a wire rack to cool completely.
- Make the Royal Icing – While the cookies cool, make the icing. In a medium bowl, combine 2 cups of sifted powdered sugar and 2 tablespoons of meringue powder. Add 3 tablespoons of water and mix on low speed until combined. Add more water, one teaspoon at a time, until the icing reaches a consistency that holds a ribbon for 3-4 seconds before sinking. Add 1 teaspoon of black gel food coloring and mix until uniform.
- Pipe the Faces – Transfer the black icing to a piping bag with a small round tip. Outline each cookie with the icing, then fill in the center. Use a toothpick to spread the icing into the corners and pop any air bubbles. For the eyes, use a separate piping bag with white royal icing to pipe two small dots. Let the icing dry completely, about 2 hours at room temperature.
Troubleshooting Note: If your dough sticks to the rolling pin, it’s too warm. Pop it back in the fridge for 15 minutes. If the cookies spread too much in the oven, your dough wasn’t chilled enough. Next time, add an extra 30 minutes to the chilling time.
Cooking Tips & Techniques
I’ve made these cookies more times than I can count, and I’ve learned a few things along the way. Here are the tips that make the biggest difference.
Get the Dough Temperature Right – This is the most important thing. Warm dough spreads into shapeless blobs. Chilled dough holds its shape. I keep my dough in the fridge between batches. If I’m working slowly, I’ll even pop the shaped cookies back in the fridge for 10 minutes before baking. It makes a huge difference.
Don’t Skip the Almond Extract – I know it seems like a small thing, but that half teaspoon of almond extract is what makes these cookies taste special. The first time I made them, I forgot to add it. They were fine, but they didn’t have that bakery-quality flavor. The almond extract adds a subtle warmth that vanilla alone can’t achieve.
Use Gel Food Coloring – Liquid food coloring will thin out your dough and leave you with sticky, unworkable dough. Gel coloring is concentrated and won’t affect the texture. It also gives you a much deeper, truer black. I learned this the hard way when my first batch of “black” cookies came out a depressing gray.
Let the Color Develop – Black food coloring deepens over time. If your dough looks more charcoal than black, don’t panic. Let it rest in the fridge for 30 minutes, and the color will intensify. If it’s still not dark enough, knead in a few more drops of gel coloring.
Work in Batches – Roll, cut, and shape one disc of dough at a time. Keep the other disc in the fridge. This prevents the dough from warming up and becoming sticky. It also means you’re not rushing to get all the cookies shaped before the dough gets too soft.
Perfect the Icing Consistency – Royal icing that’s too thin will run off the cookies. Icing that’s too thick will be hard to spread. The perfect consistency is like honey—it flows slowly and holds a ribbon for a few seconds before sinking. If you accidentally make it too thin, add more powdered sugar. Too thick, add water a drop at a time.
Variations & Adaptations
One of the best things about these spooky black cat sugar cookies is how easy they are to customize. Here are some variations I’ve tried and loved.
Gluten-Free Version – Substitute the all-purpose flour with a 1:1 gluten-free baking flour blend. I’ve used King Arthur Measure for Measure with great results. Add an extra tablespoon of flour if the dough feels too sticky. The cookies will be slightly more delicate, so handle them gently when transferring to the baking sheet.
Vegan Option – Use vegan butter sticks (not tub margarine) and substitute the egg with a flax egg (1 tablespoon ground flaxseed mixed with 3 tablespoons water, let sit for 5 minutes). For the royal icing, use aquafaba (the liquid from a can of chickpeas) instead of meringue powder. Beat 3 tablespoons of aquafaba with the powdered sugar until stiff peaks form.
Different Shapes – Once you master the basic cat shape, try other Halloween designs. Cut the circles and add different ear shapes for bats or pumpkins. You can also use small cookie cutters to make crescent moons, ghosts, or spider webs from the dough scraps.
Flavor Twists – Add ¼ cup of cocoa powder to the dry ingredients for chocolate black cats. Or try adding 1 teaspoon of cinnamon and ¼ teaspoon of nutmeg for a warm, spiced version. I made a batch with orange zest once, and they were incredible—the citrus cuts through the sweetness perfectly.
Color Variations – Make a batch of purple or orange cats for a more colorful Halloween spread. Use the same recipe but swap the black food coloring for purple or orange gel coloring. You can also make a batch of white cats with black faces for a reverse-color effect.
Serving & Storage Suggestions
These cookies are best served at room temperature, which lets the royal icing set properly and gives the cookies their perfect texture. Arrange them on a platter with other Halloween treats—pumpkin cupcakes, ghost brownies, or candy corn. They make a stunning centerpiece for any Halloween party.
Storage Instructions: Store undecorated cookies in an airtight container at room temperature for up to 1 week. Layer them between sheets of parchment paper to prevent sticking. Decorated cookies should be stored in a single layer once the icing is completely dry. They’ll stay fresh for 5-7 days.
Freezer Instructions: You can freeze the dough for up to 3 months. Wrap it tightly in plastic wrap and then in foil. Thaw in the refrigerator overnight before rolling and cutting. Baked, undecorated cookies also freeze well for up to 2 months. Thaw at room temperature before decorating.
Reheating Tip: If you like your cookies slightly warm, pop them in a 300°F (150°C) oven for 3-4 minutes. Don’t microwave them—it will make the royal icing sticky and ruin the texture.
Flavor Development: These cookies actually taste better the day after baking. The flavors meld together overnight, and the texture softens slightly. If you can resist eating them all on day one, you’ll be rewarded on day two.
Nutritional Information & Benefits
Let’s be honest—these are cookies, not health food. But here’s what you should know about what’s in them.
Per Cookie (approximate, based on 24 cookies): 165 calories, 8g fat, 22g carbohydrates, 2g protein, 12g sugar, 1g fiber.
Ingredient Benefits: The butter provides vitamin A and healthy fats. Eggs add protein and B vitamins. Almond extract comes from almonds, which are rich in vitamin E and healthy monounsaturated fats. The cookies are free from artificial preservatives and high-fructose corn syrup when made from scratch.
Dietary Considerations: This recipe contains dairy, eggs, and gluten. For a dairy-free version, use vegan butter. For egg-free, use a flax egg. For gluten-free, use a 1:1 gluten-free flour blend. The cookies are nut-free if you omit the almond extract, though they won’t have quite the same flavor.
My Perspective: I believe in balance. These cookies are a treat for special occasions, and there’s nothing wrong with that. Baking them from scratch means you control what goes into them—no weird preservatives or artificial flavors. Plus, the act of baking itself is good for the soul. There’s something meditative about rolling dough and piping icing. It’s a form of self-care that happens to produce delicious results.
Conclusion
These spooky black cat sugar cookies have become a Halloween tradition in my house, and I hope they become one in yours too. They’re simple enough for a weeknight baking session, but special enough to bring to any Halloween gathering. The best part? You don’t need fancy cookie cutters or professional decorating skills. Just a glass, a knife, and a little patience.
I love these cookies because they remind me that night in the kitchen with my niece. She taught me that sometimes the best solutions are the simplest ones. That a drinking glass and a good idea can be more valuable than all the specialty tools in the world. And that being wrong about something can lead to something wonderful.
So go ahead—make a batch. Let the kids shape the ears. Pipe silly faces. Eat a few warm from the oven. And if you come up with your own variation, I’d love to hear about it. Drop a comment below and tell me how your black cats turned out. Happy Halloween, and happy baking!
Frequently Asked Questions
Can I make these cookies ahead of time?
Absolutely. You can make the dough up to 3 days ahead and keep it in the fridge. You can also bake the cookies up to a week ahead and store them in an airtight container. Decorate them the day you plan to serve them for the freshest look.
Why did my cookies spread too much?
This usually happens when the dough isn’t chilled enough. Make sure you chill the dough for at least 1 hour before rolling. If your kitchen is warm, pop the shaped cookies back in the fridge for 10 minutes before baking. Also, check that your baking powder isn’t expired—old leavening can cause excess spreading.
Can I use liquid food coloring instead of gel?
You can, but I don’t recommend it. Liquid food coloring will thin out your dough and make it sticky. You’ll need to add a lot to get a deep black color, which can affect the texture. Gel coloring is concentrated and won’t change the dough consistency.
How do I get the royal icing perfectly smooth?
The key is getting the right consistency. The icing should hold a ribbon for 3-4 seconds before sinking back into the bowl. When you’re piping, use a toothpick to spread the icing into the corners and pop any air bubbles. Let the cookies sit undisturbed until the icing is completely dry.
Can I freeze the decorated cookies?
I don’t recommend freezing decorated cookies. The royal icing can become sticky and lose its shine when thawed. Instead, freeze the undecorated cookies and ice them fresh when you’re ready to serve. They’ll look and taste much better.
PrintSpooky Black Cat Sugar Cookies – Easy Halloween Treat
These spooky black cat sugar cookies are simple enough to make with kids, but impressive enough for any Halloween party. No special cookie cutters needed—just a drinking glass and a knife.
- Prep Time: 20 minutes
- Cook Time: 10 minutes
- Total Time: 1 hour 30 minutes (includes chilling and cooling)
- Yield: 24 cookies 1x
- Category: Dessert
- Cuisine: American
Ingredients
- 1 cup (226g) unsalted butter, softened
- 1 cup (200g) granulated sugar
- 1 large egg, room temperature
- 1 teaspoon vanilla extract
- ½ teaspoon almond extract
- 2½ cups (312g) all-purpose flour
- 1 teaspoon baking powder
- ½ teaspoon fine sea salt
- 1–2 teaspoons black gel food coloring
- 2 cups (240g) powdered sugar, sifted
- 2 tablespoons meringue powder
- 3–4 tablespoons water
- 1 teaspoon black gel food coloring (for icing)
- White royal icing (for eyes)
Instructions
- Cream the butter and sugar: In a large mixing bowl, beat 1 cup of softened butter with 1 cup of granulated sugar until light and fluffy, about 3 minutes on medium speed. Scrape down the sides halfway through.
- Add the wet ingredients: Beat in 1 large egg, 1 teaspoon of vanilla extract, and ½ teaspoon of almond extract until just combined.
- Mix the dry ingredients: In a separate bowl, whisk together 2½ cups of all-purpose flour, 1 teaspoon of baking powder, and ½ teaspoon of salt.
- Combine wet and dry: Gradually add the dry ingredients to the wet mixture, mixing on low speed until the dough just comes together.
- Add the black food coloring: Add 1-2 teaspoons of black gel food coloring and mix on low until evenly distributed. The dough will look gray at first but darkens as it sits.
- Chill the dough: Divide the dough into two discs, wrap each in plastic wrap, and refrigerate for at least 1 hour.
- Preheat the oven: Preheat oven to 350°F (175°C). Line two baking sheets with parchment paper.
- Roll out the dough: On a lightly floured surface, roll one disc of dough to about ¼-inch thickness.
- Cut the circles: Use a drinking glass to cut circles from the dough. Press straight down and lift—do not twist.
- Shape the ears: With a small knife, cut two small triangles from the top of each circle to form cat ears. Remove the excess dough from between the ears.
- Bake the cookies: Place the shaped cookies 2 inches apart on the prepared baking sheets. Bake for 8-10 minutes, rotating the pans halfway through. Let cool on the baking sheet for 5 minutes, then transfer to a wire rack to cool completely.
- Make the royal icing: In a medium bowl, combine 2 cups of sifted powdered sugar and 2 tablespoons of meringue powder. Add 3 tablespoons of water and mix on low speed. Add more water, one teaspoon at a time, until the icing holds a ribbon for 3-4 seconds. Add 1 teaspoon of black gel food coloring and mix until uniform.
- Pipe the faces: Transfer the black icing to a piping bag with a small round tip. Outline each cookie, then fill in the center. Use a toothpick to spread the icing. For the eyes, pipe two small dots with white royal icing. Let the icing dry completely, about 2 hours.
Notes
For the blackest cookies, let the colored dough rest for 30 minutes. The color deepens as it sits. If dough sticks to the rolling pin, it’s too warm—chill for 15 minutes. If cookies spread too much, dough wasn’t chilled enough. Royal icing should be like honey—flows slowly and holds a ribbon for a few seconds.
Nutrition
- Serving Size: 1 cookie
- Calories: 165
- Sugar: 12
- Sodium: 80
- Fat: 8
- Saturated Fat: 5
- Carbohydrates: 22
- Fiber: 1
- Protein: 2
Keywords: Halloween cookies, black cat cookies, sugar cookies, no cookie cutter, easy Halloween treat, spooky cookies