I was elbow-deep in frosting at my kitchen table last Tuesday night—a Tuesday, of all nights—when the smell of cocoa powder hit me. Not the powder itself, but the dry, dusty-sweet scent of it drifting up from the bowl, and suddenly I was seven years old, standing on a wobbly stool in my Aunt Josie’s cramped apartment kitchen. She was humming some off-key tune, her flour-dusted hands moving like she was conducting a tiny orchestra of bowls and spoons. I can still see the crack in her favorite mixing bowl, a thin dark line that looked like a tiny lightning bolt. She never threw it away. “Adds character,” she’d say, winking. I didn’t get it then. Honestly, I was just there for the batter.
That memory came back so sharp it almost hurt. Aunt Josie has been gone for years now, and that cracked bowl is probably in a landfill somewhere. But the feeling—the warm, slightly chaotic happiness of making something messy and delicious with someone who didn’t care about perfection—that’s what I was chasing when I started on these Spooky Chocolate Spider Web Cupcakes. I wanted to recreate that exact sensation, not just the dessert. You know that feeling when a recipe isn’t just about the food? It’s about the hands that made it, the laughter that filled the room, the way the kitchen smelled like sugar and safety.
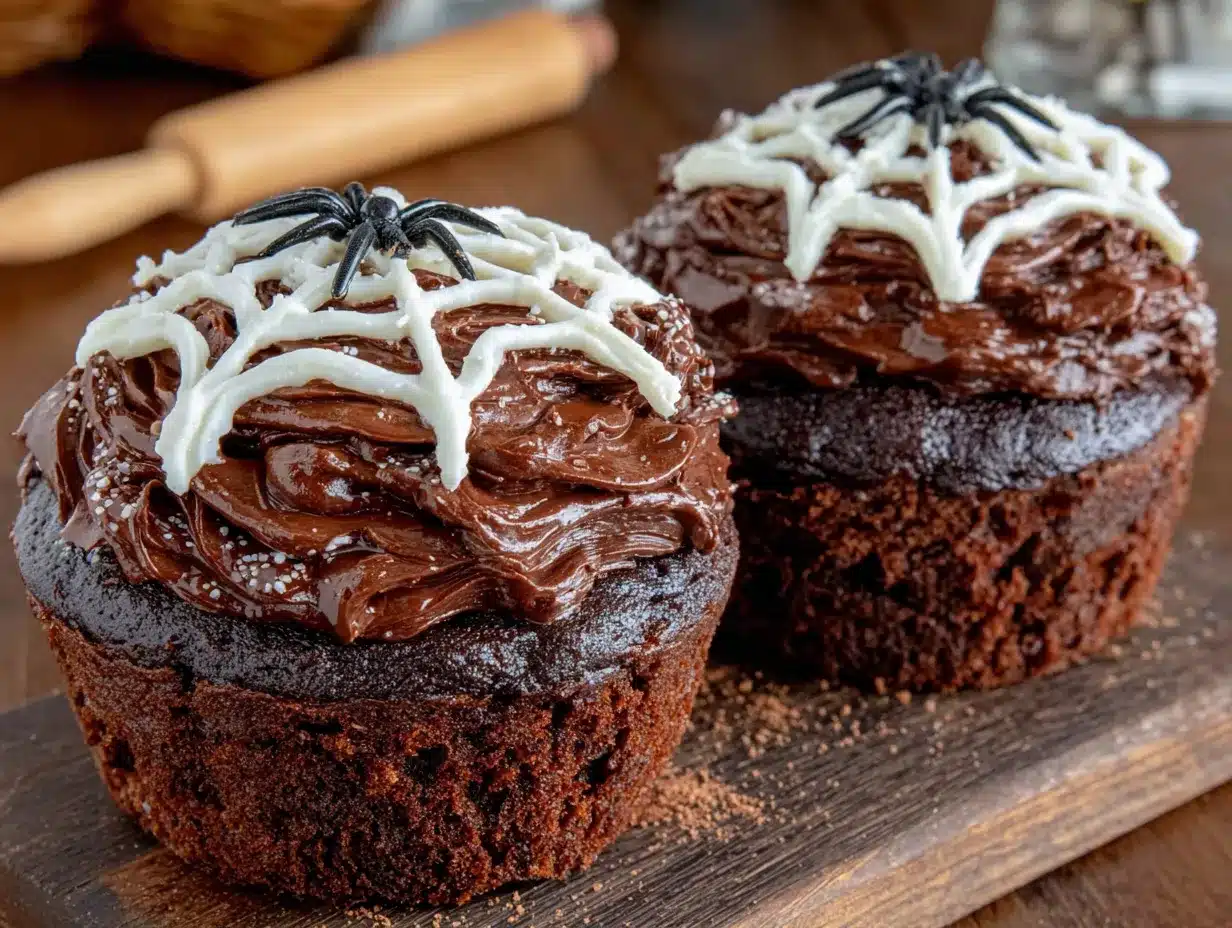
These cupcakes aren’t just for Halloween. They’re for that moment when you need to feel like a kid again, even if just for an hour. The process is a little messy, a little sticky, and absolutely worth it. I messed up the first batch of frosting—too thin, it ran right off the cupcake like a sad little waterfall. But that’s the thing about baking, right? You learn from the spills. And now, I’ve got a version that’s spooky, chocolatey, and surprisingly easy to pull off. Let me tell you, there’s nothing quite like the look on someone’s face when they bite into a cupcake that looks like a spider web and tastes like pure chocolate bliss.
So, whether you’re hosting a Halloween party or just want to surprise your family with something special, these spider web cupcakes are your ticket to a little bit of magic. They’re the kind of treat that makes you close your eyes after the first bite—and maybe, just maybe, remember a Tuesday night from long ago.
Why You’ll Love This Recipe
Let’s be real—Halloween baking can be a total pain sometimes. Between the fancy piping tips and the edible glitter that ends up all over your floor, it’s easy to get overwhelmed. But these Spooky Chocolate Spider Web Cupcakes? They’re different. They’re the recipe I turn to when I want maximum spooky effect without losing my mind.
- Quick & Easy: From start to finish, you’re looking at about 45 minutes. Perfect for a last-minute Halloween treat or a fun weekend project with the kids.
- Simple Ingredients: You probably have most of these in your pantry right now. No weird gelatin sheets or obscure food colorings—just good old-fashioned baking staples.
- Perfect for Halloween Parties: These are the stars of any spooky spread. They look impressive but are secretly simple to decorate.
- Crowd-Pleaser: Kids love the spider web design, and adults love the rich, moist chocolate cake. It’s a win-win.
- Unbelievably Delicious: The chocolate cake is so tender it practically melts in your mouth. And the frosting? Silky, creamy, and just the right amount of sweet.
What makes this recipe different from the dozens of other spider web cupcake recipes out there? It’s the technique. Instead of struggling with a piping bag and a toothpick, I’ve streamlined the web design so it looks flawless every time. Plus, the cake itself is tested to perfection—not too dry, not too dense. It’s the kind of chocolate cupcake that makes you wonder why you ever bothered with boxed mixes.
This recipe isn’t just good—it’s the kind that makes you close your eyes after the first bite. It’s comfort food with a spooky twist, perfect for impressing guests without the stress. Honestly, it’s the only Halloween cupcake recipe you’ll ever need.
What Ingredients You Will Need
This recipe uses simple, wholesome ingredients to deliver bold chocolate flavor and a satisfyingly tender crumb. Most of these are pantry staples, which makes this a great go-to for spontaneous baking sessions.
For the Chocolate Cupcakes
- 1 ½ cups (190g) all-purpose flour – Spoon and level it for the best texture. Too much flour makes dense cupcakes.
- 1 cup (200g) granulated sugar – Adds sweetness and helps with browning.
- ½ cup (45g) unsweetened cocoa powder – I prefer Dutch-processed for a deeper, richer chocolate flavor. Ghirardelli is my go-to brand.
- 1 teaspoon baking soda – Helps the cupcakes rise and stay fluffy.
- ½ teaspoon baking powder – Gives them a little extra lift.
- ½ teaspoon salt – Balances the sweetness and enhances the chocolate.
- 2 large eggs, room temperature – Room temperature eggs blend more evenly into the batter.
- 1 cup (240ml) buttermilk, room temperature – Makes the cake incredibly tender. No buttermilk? Add 1 tablespoon of lemon juice to regular milk and let it sit for 5 minutes.
- ½ cup (120ml) vegetable oil – Keeps the cupcakes moist for days. Canola or avocado oil works too.
- 2 teaspoons vanilla extract – Pure vanilla is best, but imitation works in a pinch.
- ½ cup (120ml) hot coffee – Don’t skip this! Coffee intensifies the chocolate flavor without making it taste like coffee. I use instant espresso powder dissolved in hot water.
For the Vanilla Buttercream Frosting
- 1 cup (226g) unsalted butter, softened – Let it sit out for about 30 minutes. It should be soft but not melty.
- 3 ½ cups (440g) powdered sugar, sifted – Sifting prevents lumps and gives you a silky smooth frosting.
- 2 teaspoons vanilla extract – Again, pure vanilla is lovely.
- 2–3 tablespoons heavy cream – Adjust to get the perfect piping consistency. Milk works too, but cream makes it richer.
- Pinch of salt – Balances the sweetness.
For the Spider Web Decoration
- Black gel food coloring – Americolor or Wilton brands give a true black without thinning the frosting.
- Optional: Candy spiders or plastic spider rings – For an extra creepy touch. I found some adorable gummy spiders at a local candy shop.
Substitution Guidance: If you need a dairy-free option, use almond milk with a splash of vinegar for the buttermilk and a vegan butter stick for the frosting. The texture will be slightly different, but still delicious. For a gluten-free version, swap the all-purpose flour with a good 1:1 gluten-free baking blend—I’ve had great results with Bob’s Red Mill.
Equipment Needed
You don’t need a professional bakery setup to make these spooky beauties. Here’s what you’ll need:
- Standard 12-cup muffin tin – Non-stick or lined with paper cups. I love using Halloween-themed liners for extra flair.
- Mixing bowls – A large one for the dry ingredients and another for the wet.
- Whisk and rubber spatula – A whisk for combining dry ingredients, a spatula for folding.
- Electric hand mixer or stand mixer – For the frosting. You can whisk by hand, but your arm will get a workout!
- Piping bags – At least two. If you don’t have piping bags, a sturdy zip-top bag with the corner snipped off works fine.
- Round piping tip (Wilton #12 or similar) – For piping the frosting base and the web lines.
- Toothpick or wooden skewer – For dragging the web design. A toothpick is easier for smaller cupcakes.
- Cooling rack – Essential for letting cupcakes cool completely before frosting.
Budget-friendly tip: If you don’t have piping bags, wash and reuse a thick plastic bag from a cereal box liner. It’s not glamorous, but it works! And if you don’t have a round piping tip, just snip a small hole in the corner of the bag—it’ll be a bit less precise, but still totally doable.
Preparation Method
Let’s get baking! Follow these steps carefully, and you’ll have a batch of spooky spider web cupcakes that look like they came from a bakery.
Step 1: Preheat and Prep
Preheat your oven to 350°F (175°C). Line your muffin tin with 12 paper liners. This is non-negotiable—the cupcakes will stick without them. I like to give the liners a quick spray of non-stick cooking spray for extra insurance, especially if I’m using cheaper liners.
Step 2: Mix Dry Ingredients
In a large bowl, whisk together the flour, sugar, cocoa powder, baking soda, baking powder, and salt. Make sure there are no lumps in the cocoa powder. I usually sift it if it looks clumpy. Set this bowl aside.
Step 3: Combine Wet Ingredients
In a separate medium bowl, whisk together the eggs, buttermilk, vegetable oil, and vanilla extract until smooth. The mixture should look pale and slightly frothy. Don’t over-whisk—just until everything is combined.
Step 4: Bring It All Together
Pour the wet ingredients into the dry ingredients. Stir gently with a rubber spatula until just combined. A few streaks of flour are okay at this point. Now, pour in the hot coffee and stir slowly. The batter will be very thin—almost like a milkshake. That’s exactly what you want. Don’t panic! The coffee makes the batter loose, but it bakes up into a moist, tender crumb.
Step 5: Fill and Bake
Divide the batter evenly among the 12 liners. I use a ¼-cup measure for even portions. Fill each liner about ⅔ full. Bake for 18–20 minutes, or until a toothpick inserted into the center comes out with just a few moist crumbs. My oven runs a little hot, so I check at 16 minutes. Let them cool in the pan for 5 minutes, then transfer to a wire rack to cool completely. Do not frost warm cupcakes—the frosting will melt into a sad puddle.
Step 6: Make the Frosting
While the cupcakes cool, make the frosting. In a large bowl (or the bowl of a stand mixer), beat the softened butter on medium speed until smooth and creamy, about 2 minutes. Add the sifted powdered sugar one cup at a time, mixing on low speed. It will look dry and crumbly at first—keep going. Add the vanilla extract and 2 tablespoons of heavy cream. Beat on medium-high for 3–4 minutes until light and fluffy. If it’s too thick, add the remaining tablespoon of cream. If it’s too thin, add a little more powdered sugar.
Step 7: Color the Frosting
Divide the frosting into two bowls: about ¾ of it in one bowl (for the white base) and ¼ in another. Add black gel food coloring to the smaller portion and stir until you get a deep, dark black. Start with a tiny drop—gel colors are concentrated. Add more until you’re satisfied.
Step 8: Pipe the Base
Fit a piping bag with a round tip (or snip the corner of a zip-top bag). Fill it with the white frosting. Pipe a generous swirl on each cooled cupcake, starting from the outside and working your way in. Don’t worry about making it perfect—the web will cover it.
Step 9: Create the Spider Web
This is the fun part. Fill a second piping bag (or a small zip-top bag with a tiny snipped corner) with the black frosting. Pipe 3–4 concentric circles on top of the white frosting, starting from the center and working outward. Then, using a toothpick or skewer, drag from the center outward through the black circles, creating the web spokes. Wipe the toothpick clean after each drag. Repeat until all cupcakes have webs.
Step 10: Add the Spider
Place a candy spider or plastic spider ring on each cupcake for the final creepy touch. If you’re using gummy spiders, press them gently into the frosting so they stay put.
Cooking Tips & Techniques
Here are some hard-earned lessons from my many batches of spider web cupcakes:
- Don’t overmix the batter. Overmixing develops gluten, which makes cupcakes tough. Stir until the flour just disappears, then stop.
- Room temperature ingredients matter. Cold eggs and buttermilk won’t emulsify properly, leading to a denser crumb. Set them out 30 minutes ahead.
- The coffee trick is real. I was skeptical the first time, but hot coffee really does deepen the chocolate flavor. Use decaf if you’re worried about caffeine.
- Let cupcakes cool completely. I learned this the hard way—frosting on a warm cupcake turns into a melty mess. Wait at least 30 minutes.
- Practice the web technique on parchment paper first. It sounds silly, but doing a few practice drags helps you get the feel for the right pressure and speed. I wasted three cupcakes before I figured it out.
- Use a toothpick for smaller cupcakes. A skewer is great for larger cakes, but for standard cupcakes, a toothpick gives you more control.
Variations & Adaptations
This recipe is wonderfully flexible. Here are a few ways to make it your own:
- Gluten-Free Option: Substitute the all-purpose flour with a 1:1 gluten-free baking blend that contains xanthan gum. The texture will be slightly more delicate, but still delicious.
- Dairy-Free Version: Use almond milk with a splash of vinegar for the buttermilk, and swap the butter with a high-quality vegan butter stick. Miyoko’s or Earth Balance work well.
- Spooky Color Twist: Instead of a white base, tint the frosting with orange or purple gel food coloring for a different Halloween vibe. I tried orange last year, and it looked like a pumpkin patch with cobwebs!
- Chocolate Frosting Variation: Add ¼ cup of melted and cooled dark chocolate to the buttercream for an extra-decadent chocolate-on-chocolate experience.
- Mini Cupcake Version: Use a mini muffin tin and bake for 10–12 minutes. These are perfect for Halloween parties where guests want a tiny treat.
Serving & Storage Suggestions
These cupcakes are best served at room temperature. The frosting is silky, and the cake is perfectly moist. Arrange them on a platter with some fake cobwebs and plastic spiders for a dramatic Halloween display. They pair beautifully with a glass of cold milk or a warm mug of apple cider.
Storage: Store unfrosted cupcakes in an airtight container at room temperature for up to 2 days. Frosted cupcakes should be refrigerated in a single layer (to avoid smudging the webs) for up to 4 days. Let them sit at room temperature for 20 minutes before serving to soften the frosting.
Freezing: You can freeze unfrosted cupcakes for up to 3 months. Wrap them individually in plastic wrap and place them in a freezer bag. Thaw at room temperature, then frost and decorate. The frosting itself can also be frozen in a piping bag for up to 2 months—just thaw it in the fridge overnight and re-whip before using.
The flavors actually deepen after a day in the fridge. I’ve found that the chocolate cake gets even more moist and rich overnight. So if you can, make these a day ahead!
Nutritional Information & Benefits
Here’s the thing—these are cupcakes, not health food. But I believe in balance. One cupcake is perfectly fine as an occasional treat. Here’s an approximate breakdown per cupcake (based on 12 servings):
- Calories: 420
- Fat: 22g
- Carbohydrates: 55g
- Protein: 4g
- Sugar: 40g
Health Benefits: The cocoa powder is rich in antioxidants called flavonoids, which can support heart health. The buttermilk adds calcium and probiotics. And honestly? The mental health benefit of baking something beautiful and sharing it with loved ones is priceless. I’m a firm believer that food made with love is good for the soul.
Allergen Note: This recipe contains wheat, dairy, and eggs. For allergen-friendly versions, see the variations section above.
Conclusion
So there you have it—Spooky Chocolate Spider Web Cupcakes that are as fun to make as they are to eat. They’re the perfect blend of nostalgia and creativity, a little bit of Halloween magic that you can whip up in under an hour. Whether you’re making them for a party, a school event, or just a quiet night in with a scary movie, these cupcakes deliver every time.
I love this recipe because it reminds me that baking doesn’t have to be perfect to be wonderful. My first batch had lopsided webs and a few frosting disasters, but you know what? They still disappeared in minutes. So don’t stress about making them look like a professional bakery’s. Embrace the imperfections—they add character.
Now I want to hear from you! Have you tried making spider web cupcakes before? What’s your favorite Halloween treat to bake? Drop a comment below and share your creations. And if you loved this recipe, please share it with your friends and family. Happy Halloween, and happy baking!
Frequently Asked Questions
Can I use a boxed cake mix for these cupcakes?
Absolutely! If you’re short on time, a chocolate boxed mix works perfectly. Just follow the package instructions and let the cupcakes cool completely before frosting. The spider web decoration will look just as impressive on a mix-based cupcake.
How do I get the black frosting really dark?
Use a high-quality black gel food coloring, not liquid drops. Start with a tiny amount and add more gradually. Let the frosting sit for 10–15 minutes after coloring—the color deepens as it rests. If it’s still not dark enough, add a tiny drop of purple or blue gel coloring to neutralize any greenish tones.
Can I make these cupcakes ahead of time?
Yes! Bake the cupcakes up to 2 days in advance and store them unfrosted in an airtight container. The frosting can be made a day ahead and stored in the fridge. When you’re ready to serve, bring the frosting to room temperature, re-whip it briefly, and decorate.
My frosting is too runny—what did I do wrong?
This usually happens if the butter was too soft or you added too much liquid. Fix it by adding more sifted powdered sugar, one tablespoon at a time, until the frosting holds its shape. You can also pop the frosting in the fridge for 10 minutes to firm it up before piping.
Can I use cream cheese frosting instead of buttercream?
Definitely! Cream cheese frosting adds a tangy contrast to the rich chocolate cake. Just be aware that it’s softer, so the spider web design might not be as sharp. Chill the frosted cupcakes for 15 minutes before piping the web for better results.
PrintSpooky Spider Web Cupcakes: Easy Halloween Chocolate Treat
These spooky spider web cupcakes are a fun and easy Halloween treat, featuring a moist chocolate cake with a silky vanilla buttercream frosting and a striking spider web design. Perfect for parties or a cozy night in, they’re sure to impress.
- Prep Time: 15 minutes
- Cook Time: 20 minutes
- Total Time: 45 minutes
- Yield: 12 servings 1x
- Category: Dessert
- Cuisine: American
Ingredients
- 1 ½ cups (190g) all-purpose flour
- 1 cup (200g) granulated sugar
- ½ cup (45g) unsweetened cocoa powder (Dutch-processed preferred)
- 1 teaspoon baking soda
- ½ teaspoon baking powder
- ½ teaspoon salt
- 2 large eggs, room temperature
- 1 cup (240ml) buttermilk, room temperature
- ½ cup (120ml) vegetable oil
- 2 teaspoons vanilla extract
- ½ cup (120ml) hot coffee
- 1 cup (226g) unsalted butter, softened
- 3 ½ cups (440g) powdered sugar, sifted
- 2 teaspoons vanilla extract
- 2–3 tablespoons heavy cream
- Pinch of salt
- Black gel food coloring
- Optional: Candy spiders or plastic spider rings
Instructions
- Preheat oven to 350°F (175°C). Line a 12-cup muffin tin with paper liners.
- In a large bowl, whisk together flour, sugar, cocoa powder, baking soda, baking powder, and salt.
- In a separate bowl, whisk together eggs, buttermilk, vegetable oil, and vanilla extract until smooth.
- Pour wet ingredients into dry ingredients and stir gently with a rubber spatula until just combined. Add hot coffee and stir slowly until batter is thin and smooth.
- Divide batter evenly among liners, filling each about ⅔ full. Bake for 18–20 minutes, or until a toothpick inserted into the center comes out with a few moist crumbs. Cool in pan for 5 minutes, then transfer to a wire rack to cool completely.
- For the frosting: Beat softened butter on medium speed until smooth and creamy, about 2 minutes. Add sifted powdered sugar one cup at a time, mixing on low. Add vanilla extract and 2 tablespoons heavy cream; beat on medium-high for 3–4 minutes until light and fluffy. Add more cream if needed.
- Divide frosting: ¾ for white base, ¼ for black. Add black gel food coloring to the smaller portion and stir until deep black.
- Fit a piping bag with a round tip and fill with white frosting. Pipe a generous swirl on each cooled cupcake.
- Fill a second piping bag with black frosting. Pipe 3–4 concentric circles on top of the white frosting. Using a toothpick, drag from the center outward through the black circles to create web spokes. Wipe toothpick clean after each drag.
- Place a candy spider or plastic spider ring on each cupcake for decoration.
Notes
Don’t overmix the batter. Use room temperature ingredients for best results. The hot coffee deepens the chocolate flavor. Let cupcakes cool completely before frosting. Practice the web technique on parchment paper first. For dairy-free, use almond milk with vinegar and vegan butter. For gluten-free, use a 1:1 gluten-free baking blend.
Nutrition
- Serving Size: 1 cupcake
- Calories: 420
- Sugar: 40
- Sodium: 280
- Fat: 22
- Saturated Fat: 12
- Carbohydrates: 55
- Fiber: 2
- Protein: 4
Keywords: Halloween cupcakes, spider web cupcakes, chocolate cupcakes, easy Halloween dessert, spooky cupcakes